Retraction guide for Microsoft Office 365
In this tutorial you will learn how to set up email retraction for Microsoft Office 365.
1. Authorize Area 1 with Office 365 for retraction
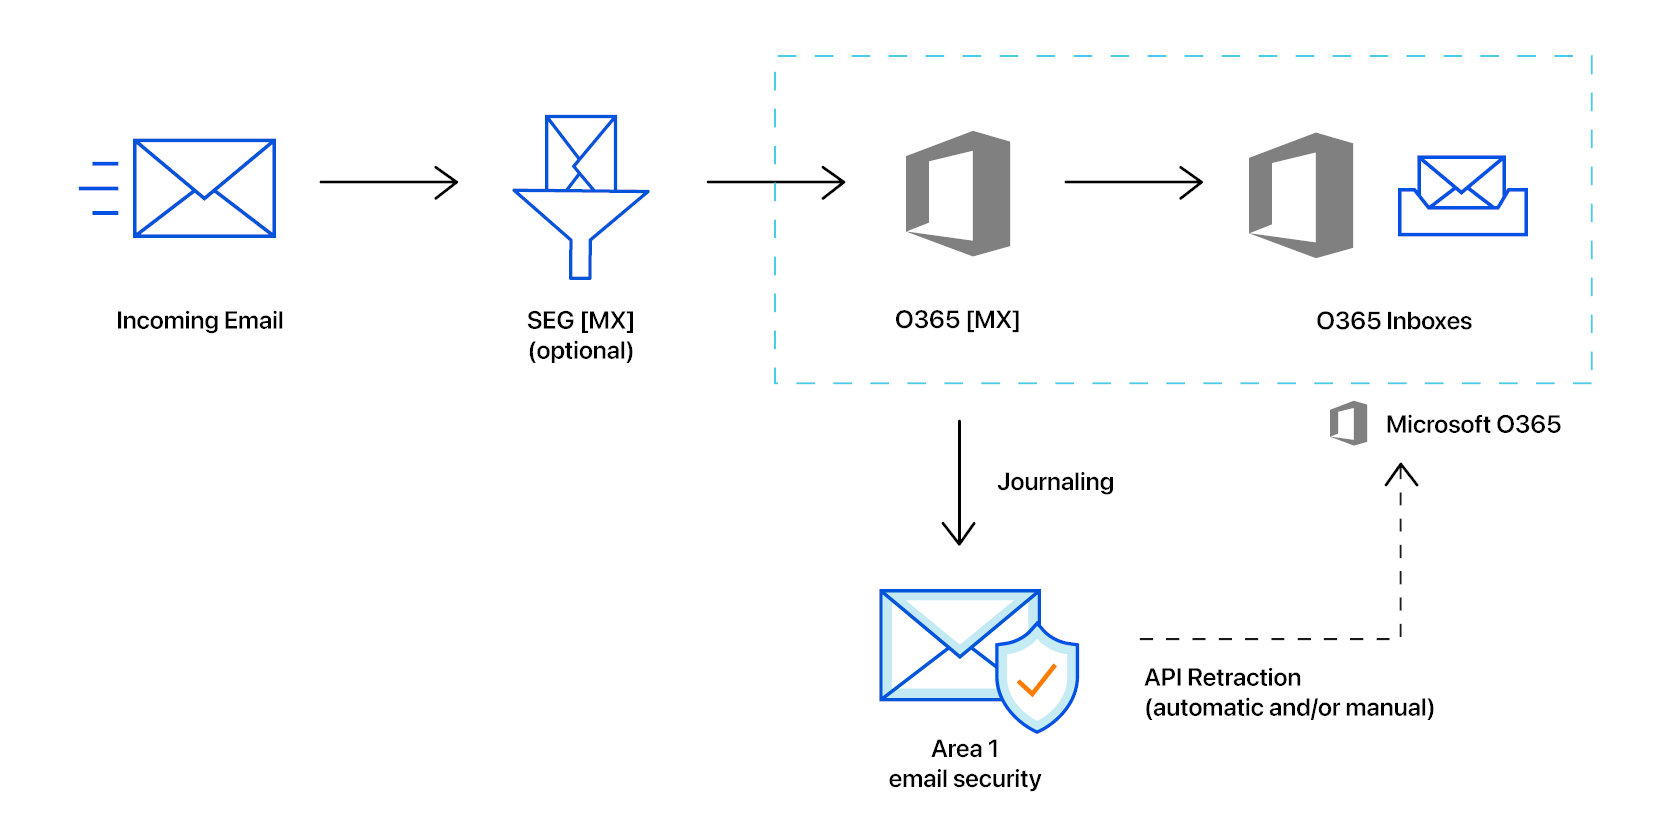
For message retraction to successfully execute, Area 1 needs to be authorized to make API calls into the Office 365 Graph API architecture. The account used to authorize Area 1 requires the Privileged role admin role.
When assigning user roles in the Office 365 console, you will find these roles in User permissions > Roles configuration > Identity admin roles.
How does the authorization work?
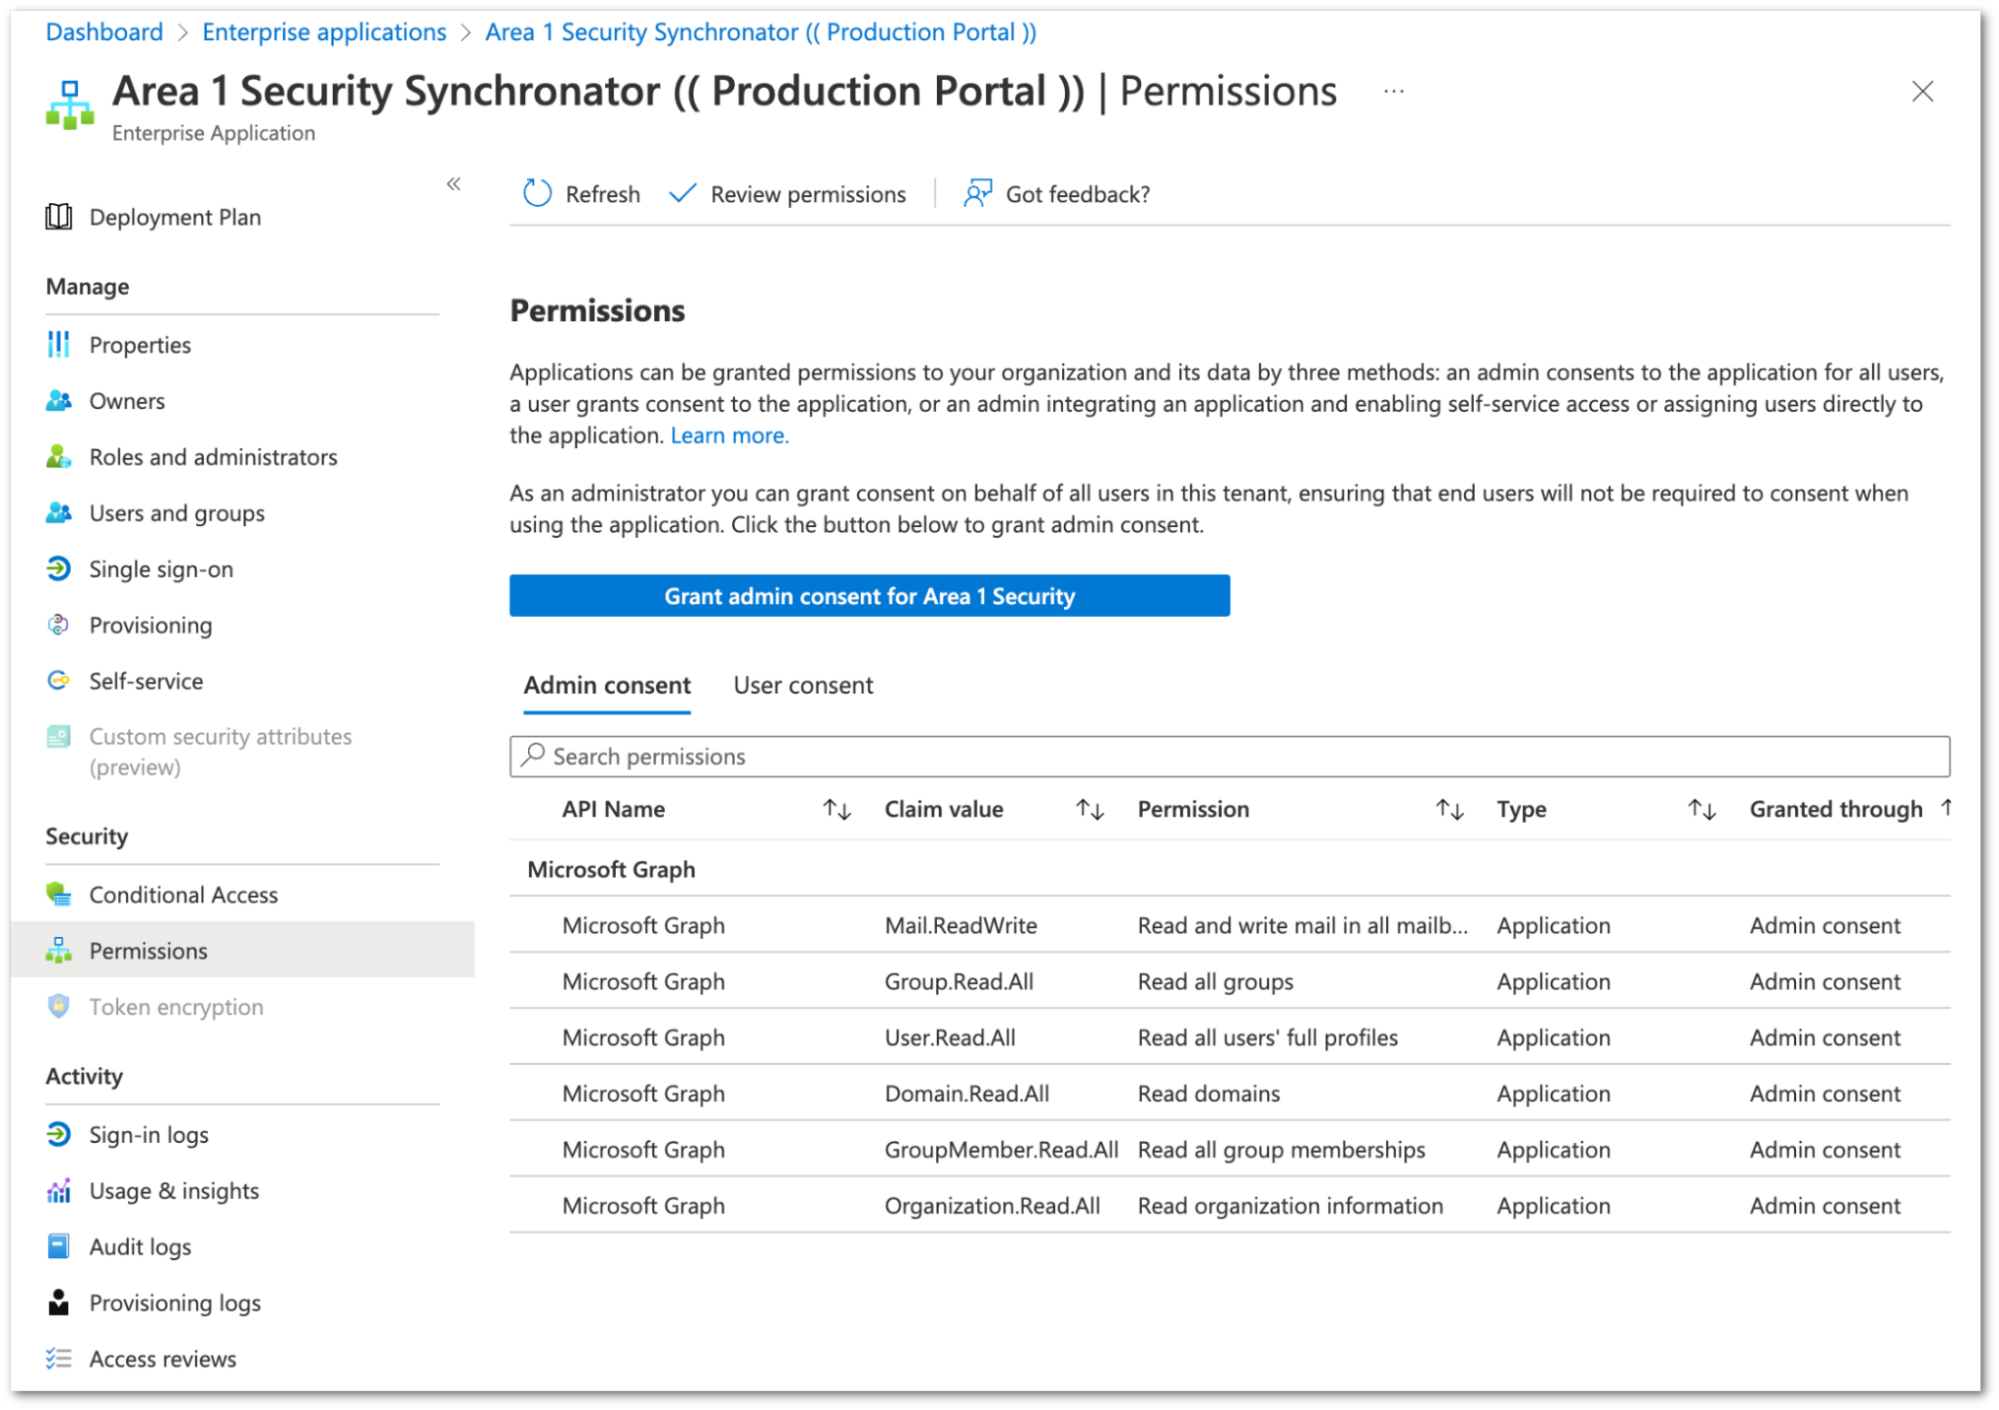
The authorization process grants Area 1 access to the Azure environment with the least applicable privileges required to function. The Enterprise Application that Area 1 registers (the Area 1 Security Synchronator) is not tied to any administrator account. Inside of the Azure Active Directory admin center you can review the permissions granted to the application in the Enterprise Application section.
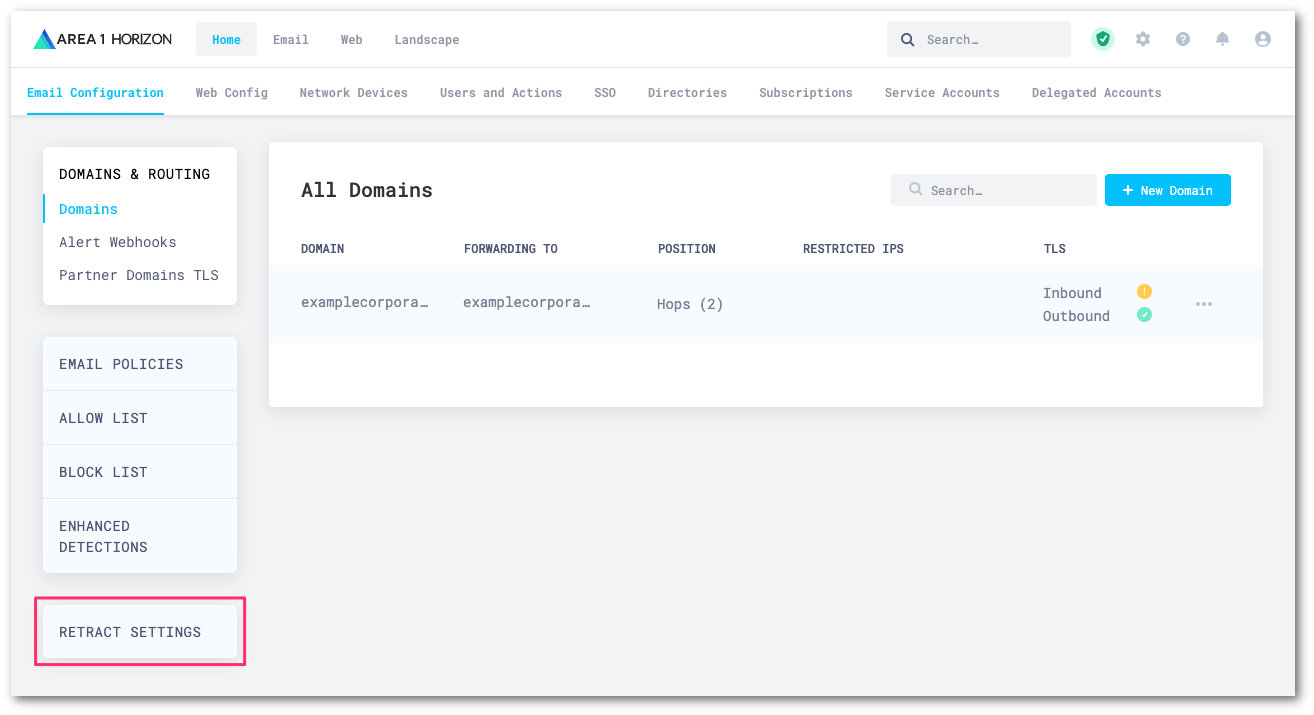
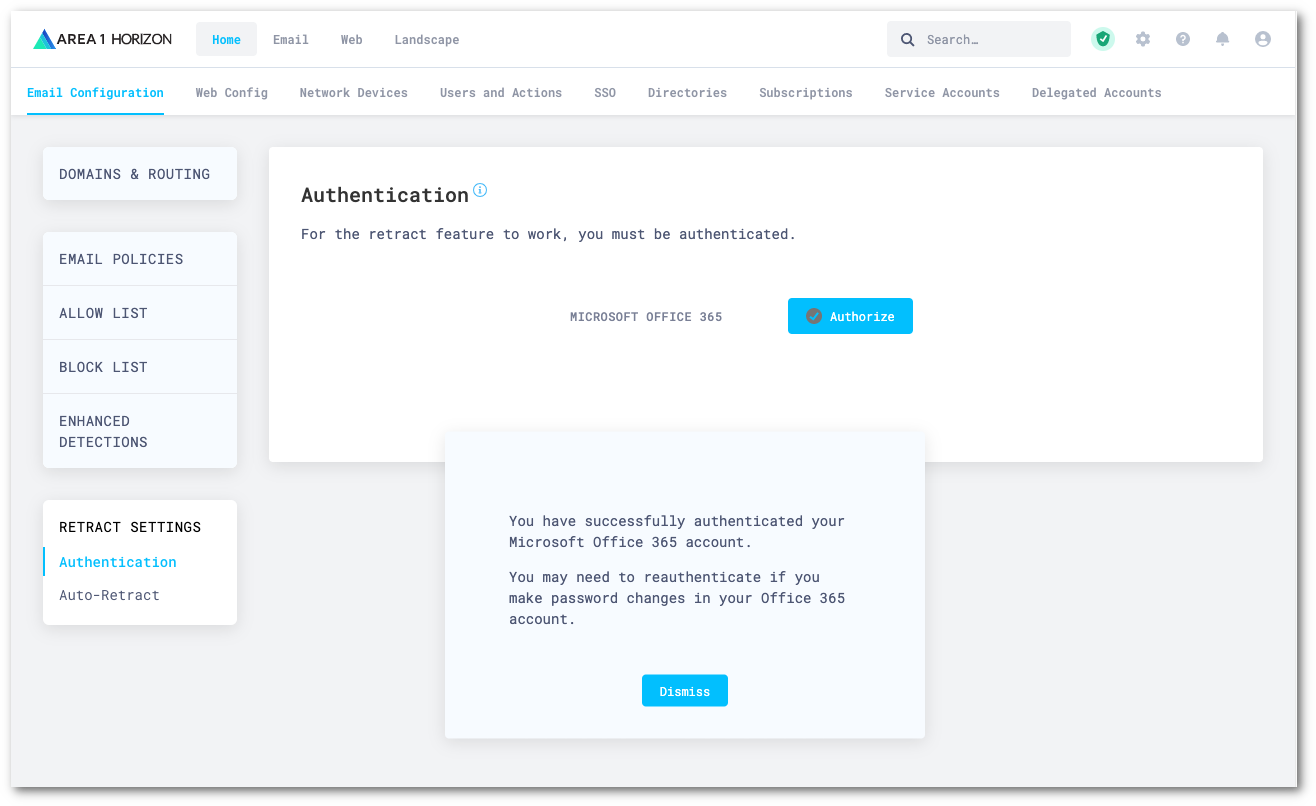
Log in to the Area 1 dashboard, and select Settings (the gear icon).
Go to Email Configuration > RETRACT SETTINGS.
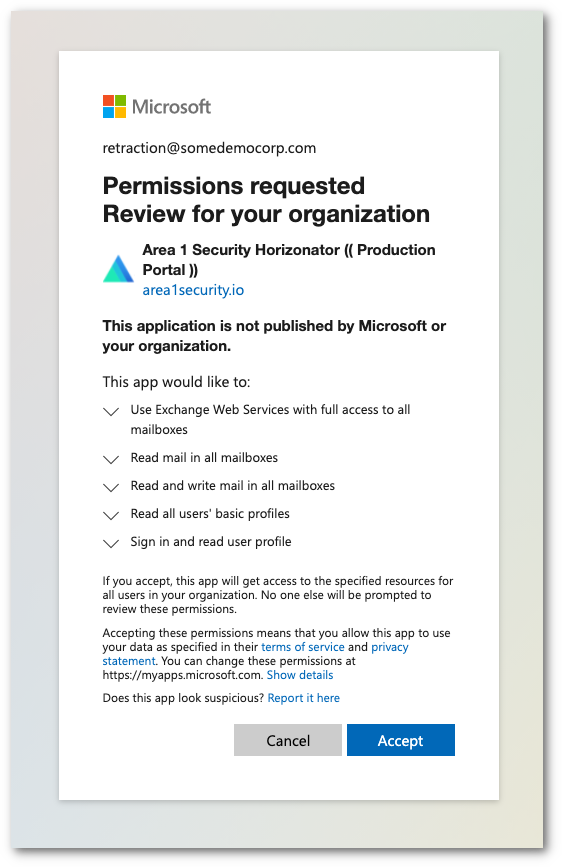
You need to authorize Area 1 to execute retractions through the Graph API of Office 365. Make sure that the account that you will be using to authenticate has the appropriate administrative roles assigned. Select Authorize to start the process.

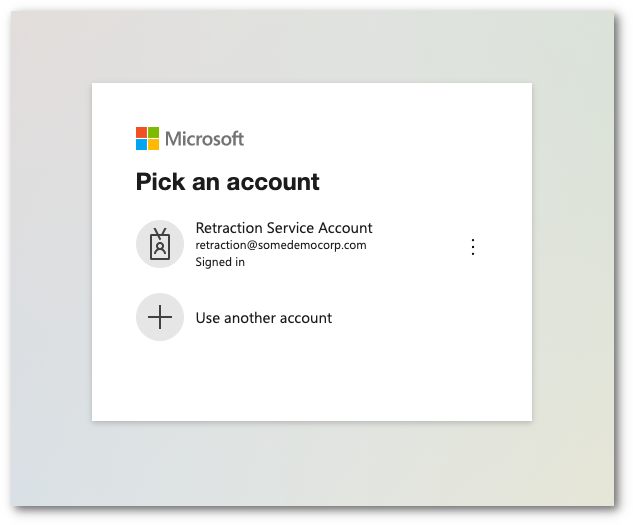
The Area 1 dashboard will redirect you to a Microsoft login page. Select or enter the appropriate account to initiate the authentication process.
Once authenticated, the system will show a dialog box with a list of the requested permissions. Select Accept to authorize the change.
Upon authorization, you will be automatically redirected to the Area 1 dashboard, with a notification that the authorization completed successfully. Select Dismiss to clear the notification.
2. Configure auto-retraction actions
You can set up auto-retraction to automatically move messages matching certain dispositions to specific folders within a user’s mailbox.
To set up automatic retraction:
Log in to the Area 1 dashboard.
Go to Settings (the gear icon).
On Email Configuration, go to Retract Settings > Auto-Retract.
Select Edit.
For each disposition, choose which folder the message should be sent to:
- No Action: Do not move the message.
- Junk Email: Sends the message to the junk or spam email folder.
- Trash: Sends the message to the trash or deleted items email folder.
- Soft Delete — user recoverable (Microsoft only): Sends the message to the user’s Deleted Items folder. Messages can be recovered by the user.
- Hard Delete — admin recoverable (Microsoft and Google): Completely deletes messages from a user’s inbox. For Office 365, the message will be deleted and cannot be recovered without using the admin eDiscovery feature. For Google Gmail messages cannot be recovered, even by the admin.
Select Update Auto-retract Settings.
3. Configure journaling
1. Configure connector for delivery to Area 1 (if required)
If your email architecture does not include an outbound gateway, you can skip this step and proceed to the next one.
On the other hand, if your email architecture requires outbound messages to traverse your email gateway, you may want to consider configuring a connector to send the journal messages directly to Area 1.
Log in to the Exchange admin center, and go to Mail flow > Connectors.
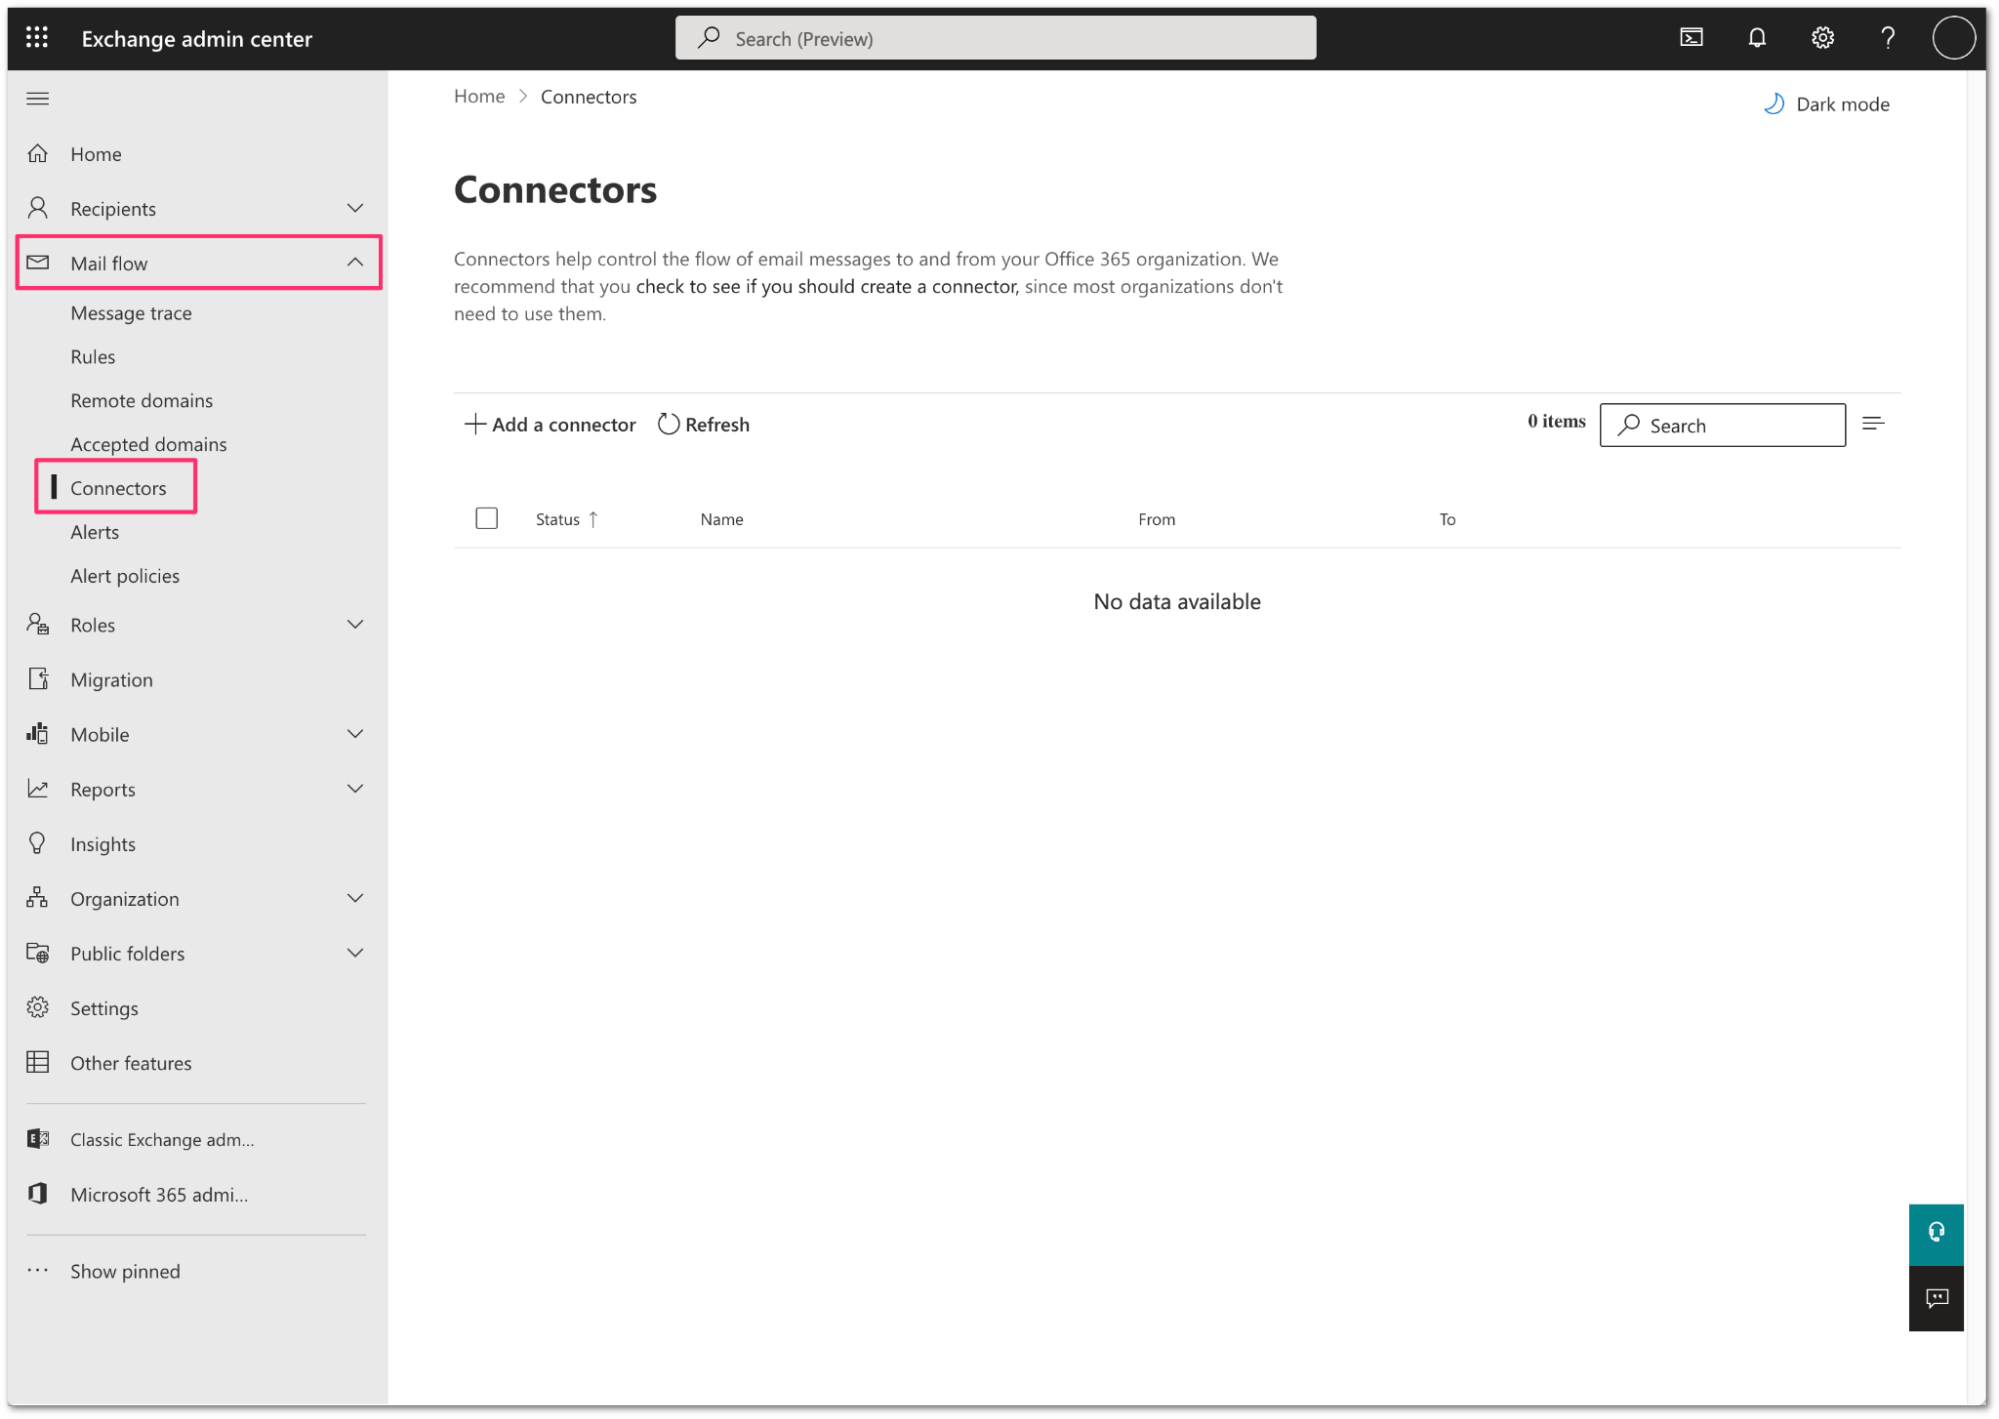
Select Add a connector.
Configure the new connector as follows:
- Connection From: Office 365
- Connection to: Partner Organization
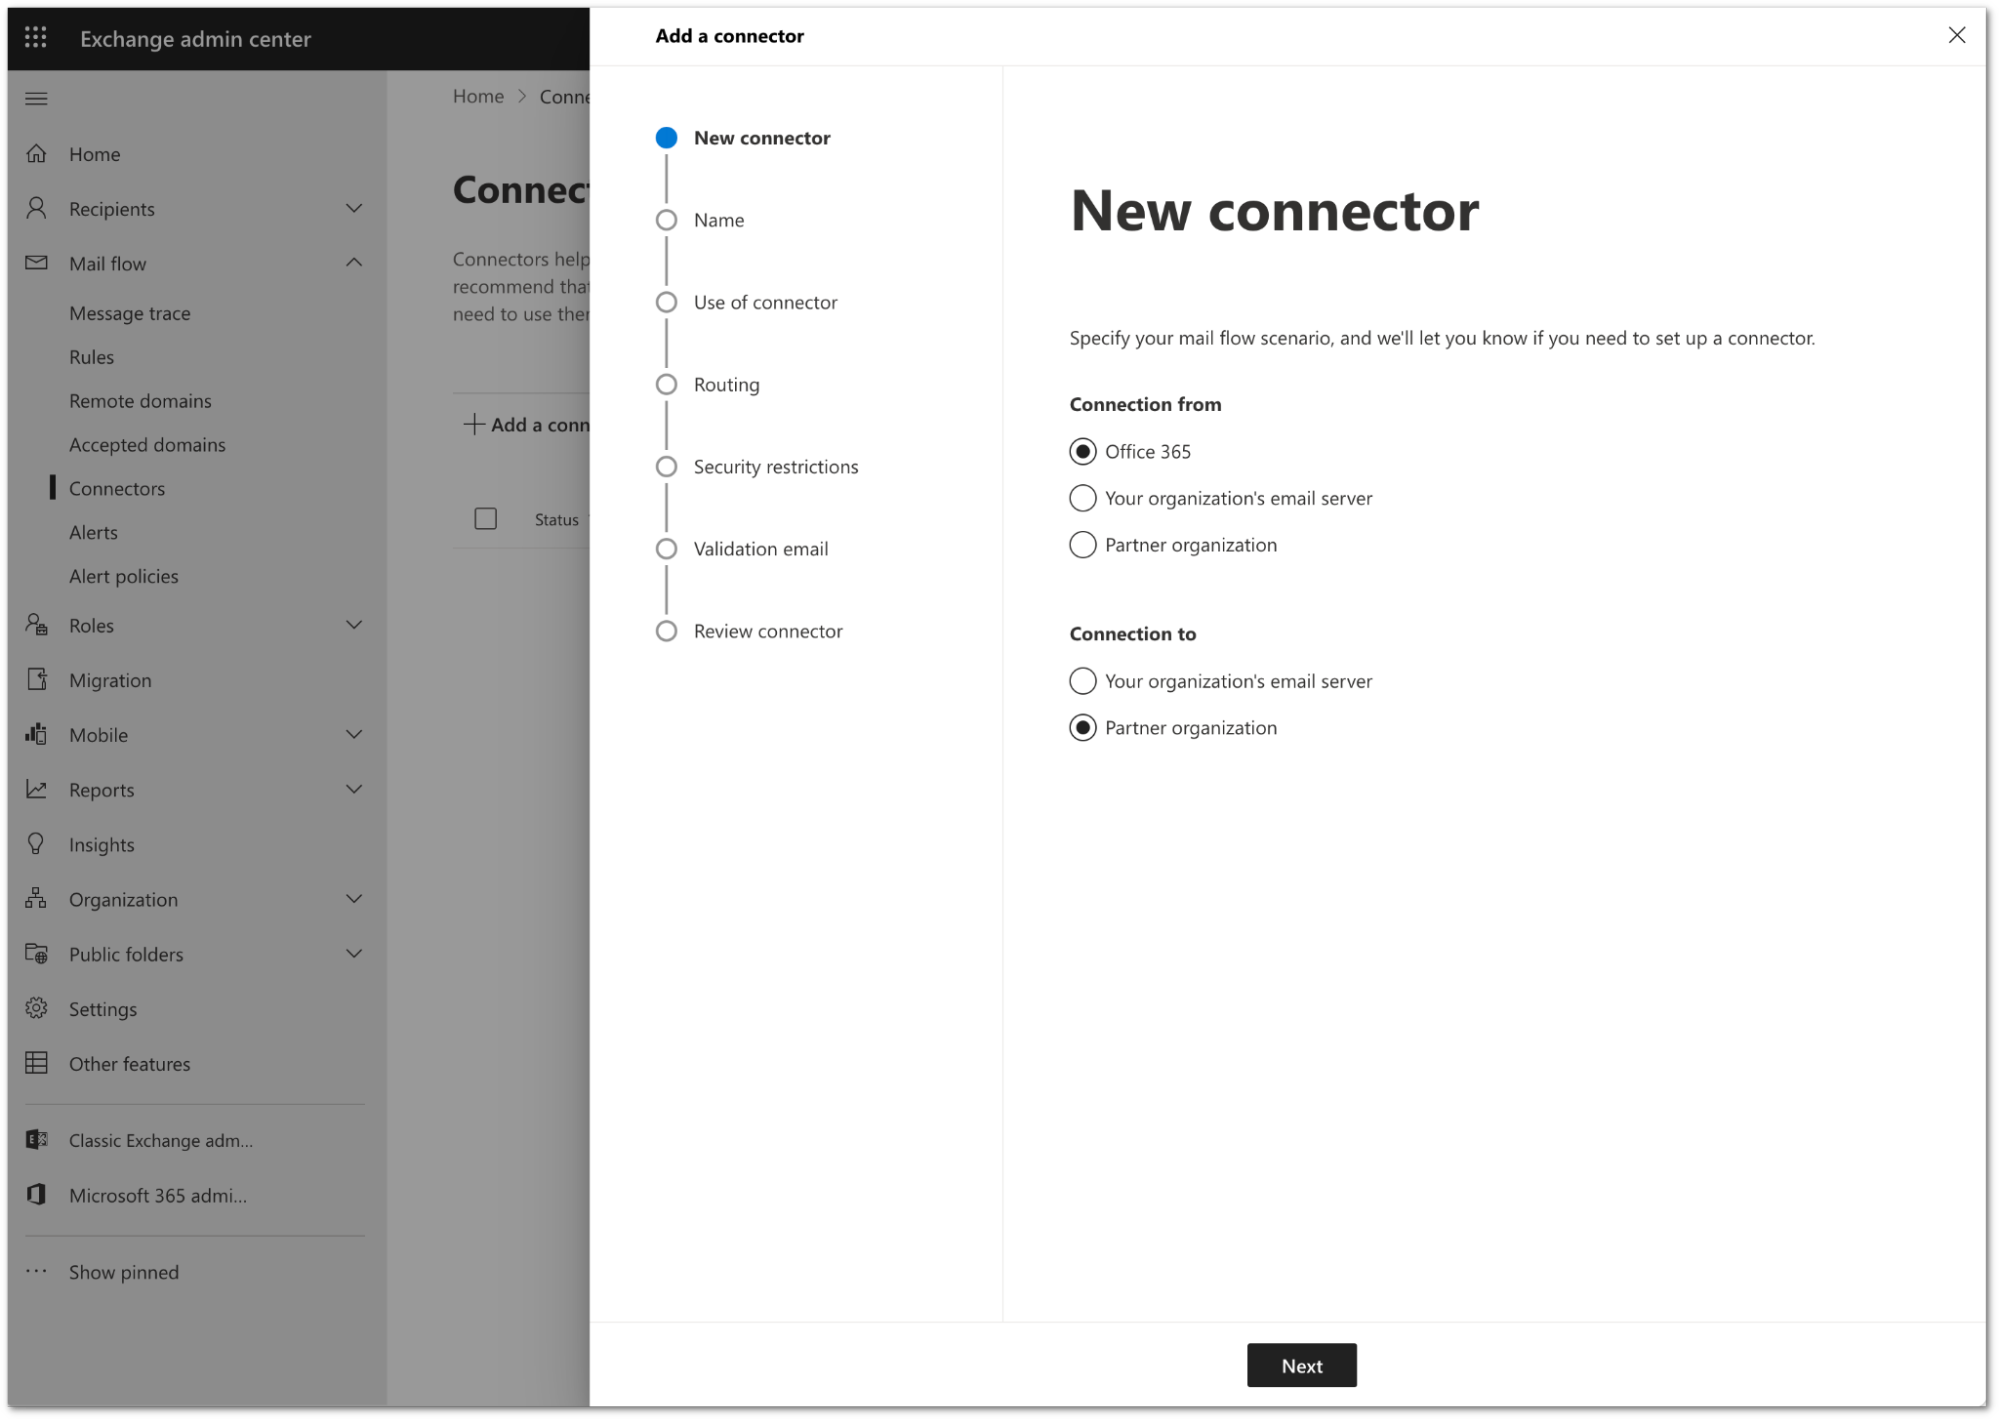
Select Next.
Configure the connector as follows:
- Name:
Deliver journal directly to Area 1 - Description:
Deliver journal directly to Area 1 - Turn it on: Enabled.
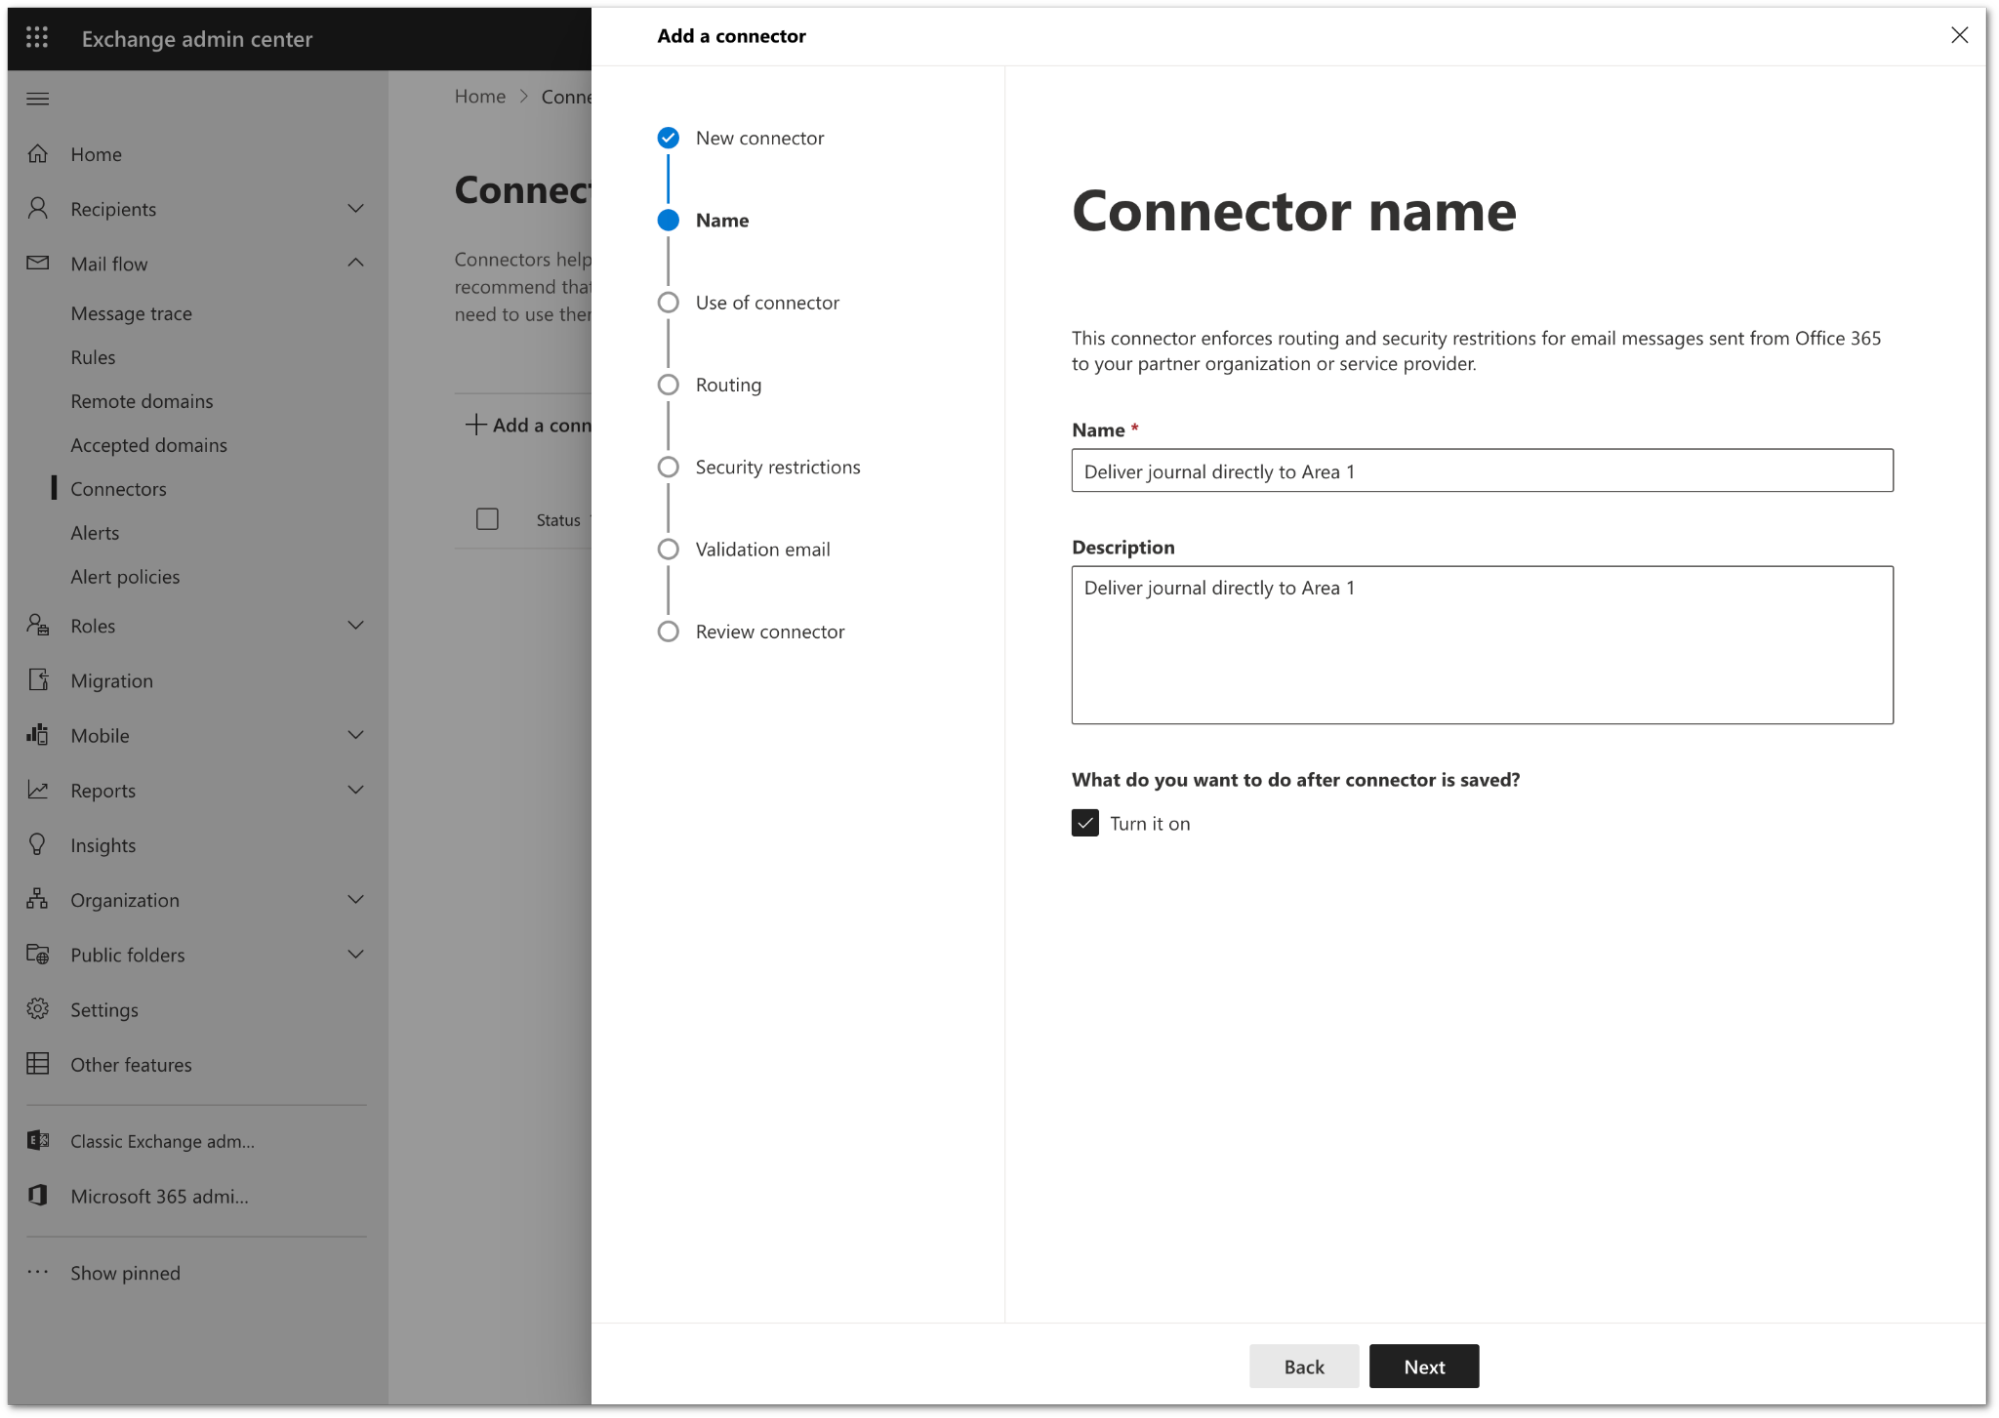
- Name:
Select Next.
Configure the Use of connector setting as follows:
- Select Only when email messages are sent to these domains.
- In the text field, enter
journaling.mxrecord.io, and select + to add the domain.
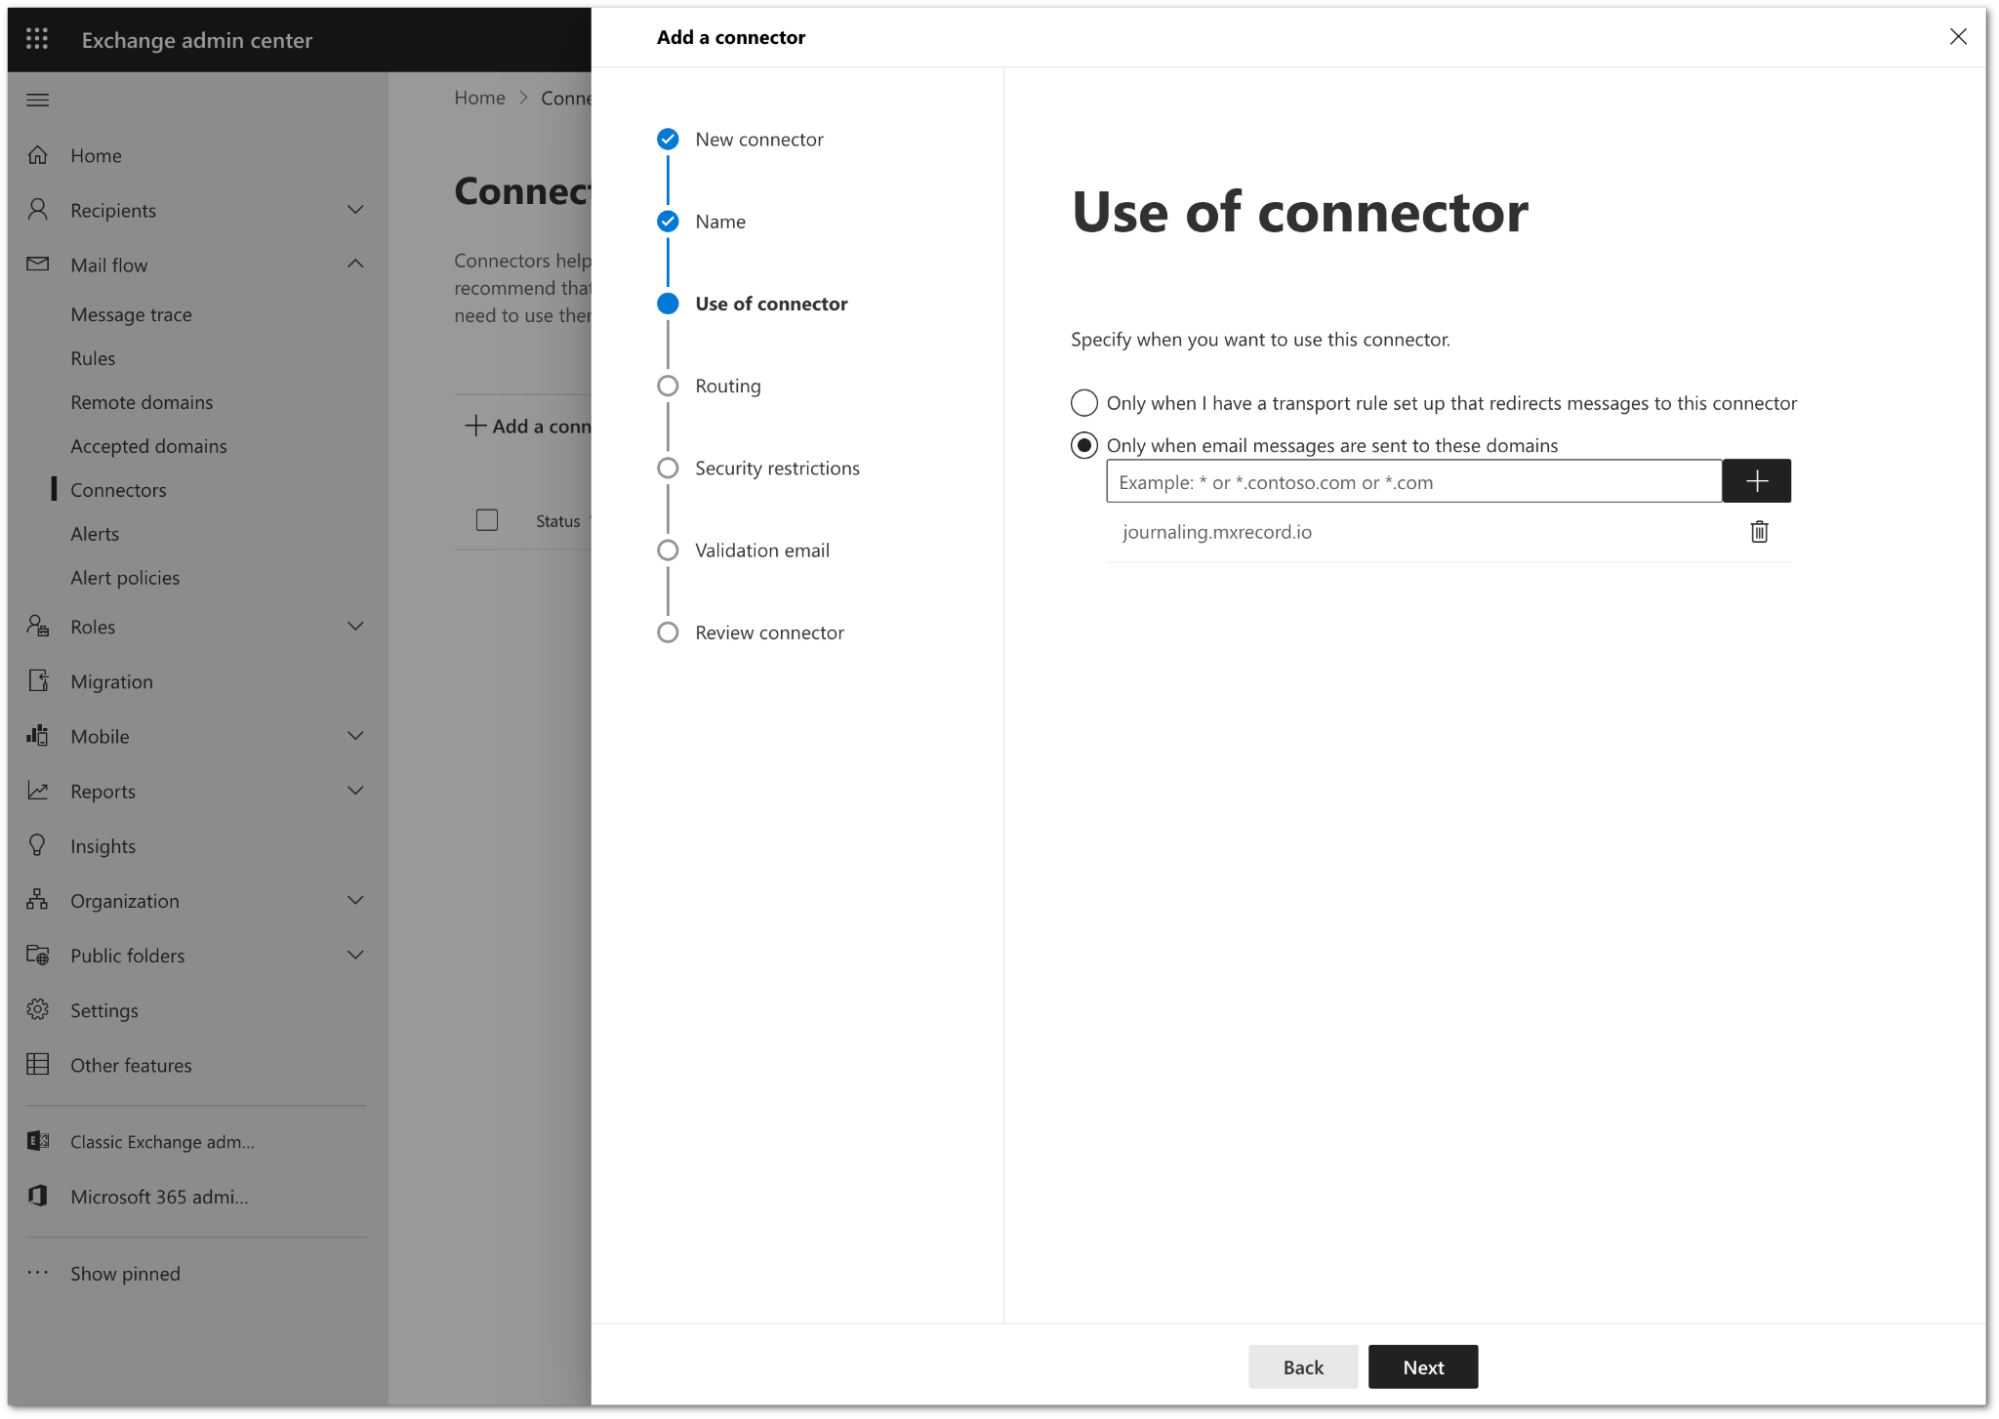
Select Next.
Configure the Routing setting as follows:
- Select Route email through these smart hosts.
- In the text field, enter the following
smart hosts. Select the + button after each host to add it to the configuration:
mailstream-east.mxrecord.iomailstream-west.mxrecord.io
- If there is a requirement to enforce traffic through the EU region, use the following smart host instead:
mailstream-eu1.mxrecord.io
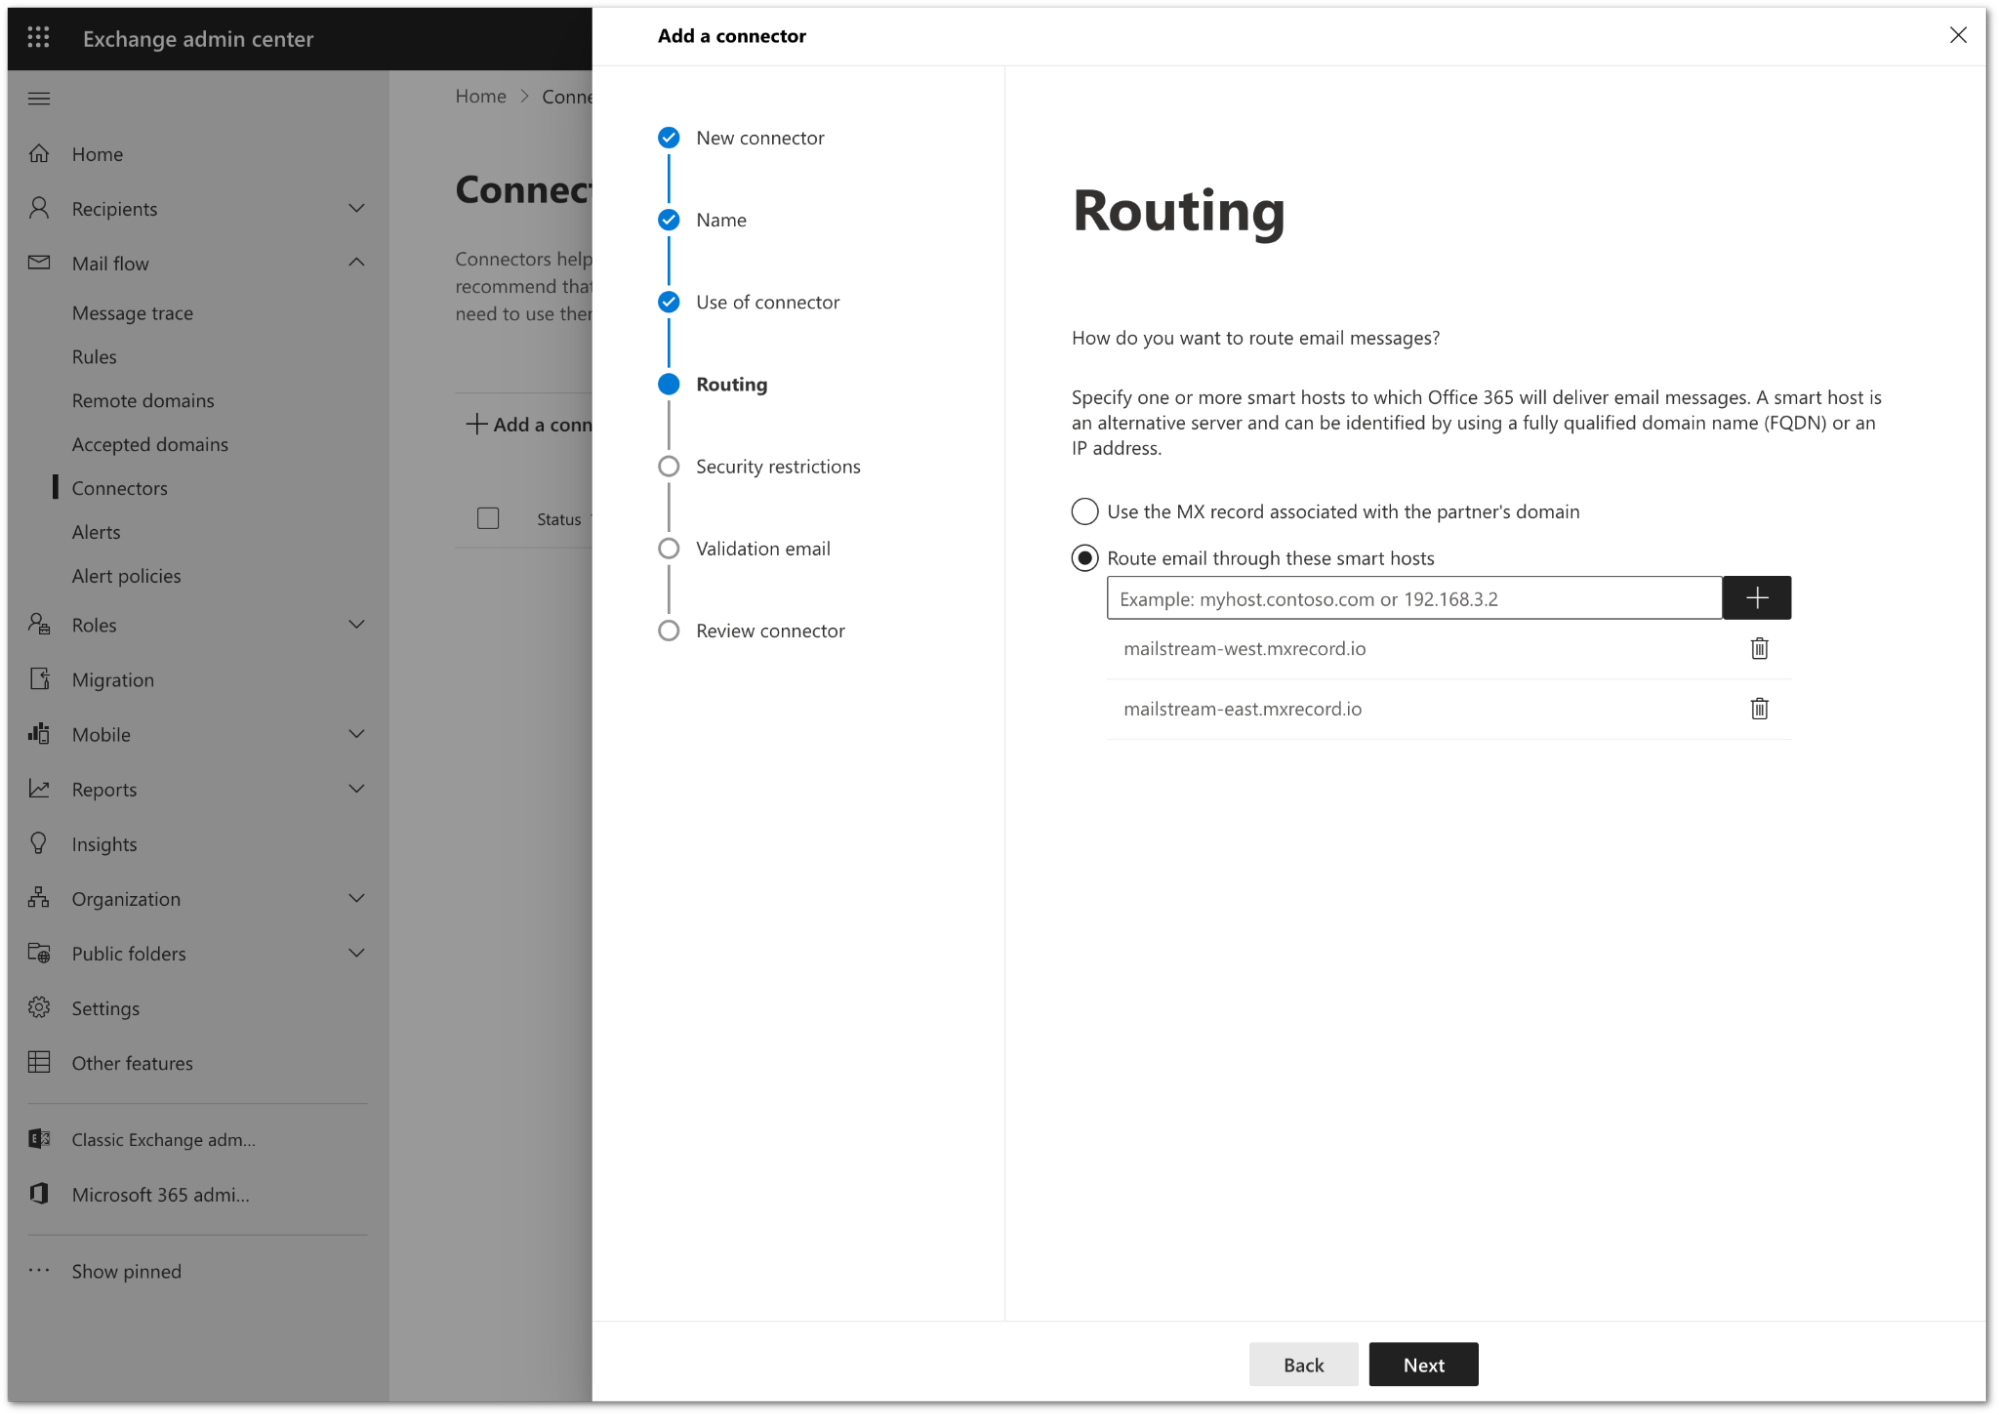
Select Next.
In Security restrictions, you need to keep the default TLS configuration. Review the following settings:
- Make sure the Always use Transport Layer Security (TLS) to secure the connection (recommended) checkbox is selected.
- In Connect only if the recipients email server certificate matches this criteria select Issued by a trusted certificate authority (CA).
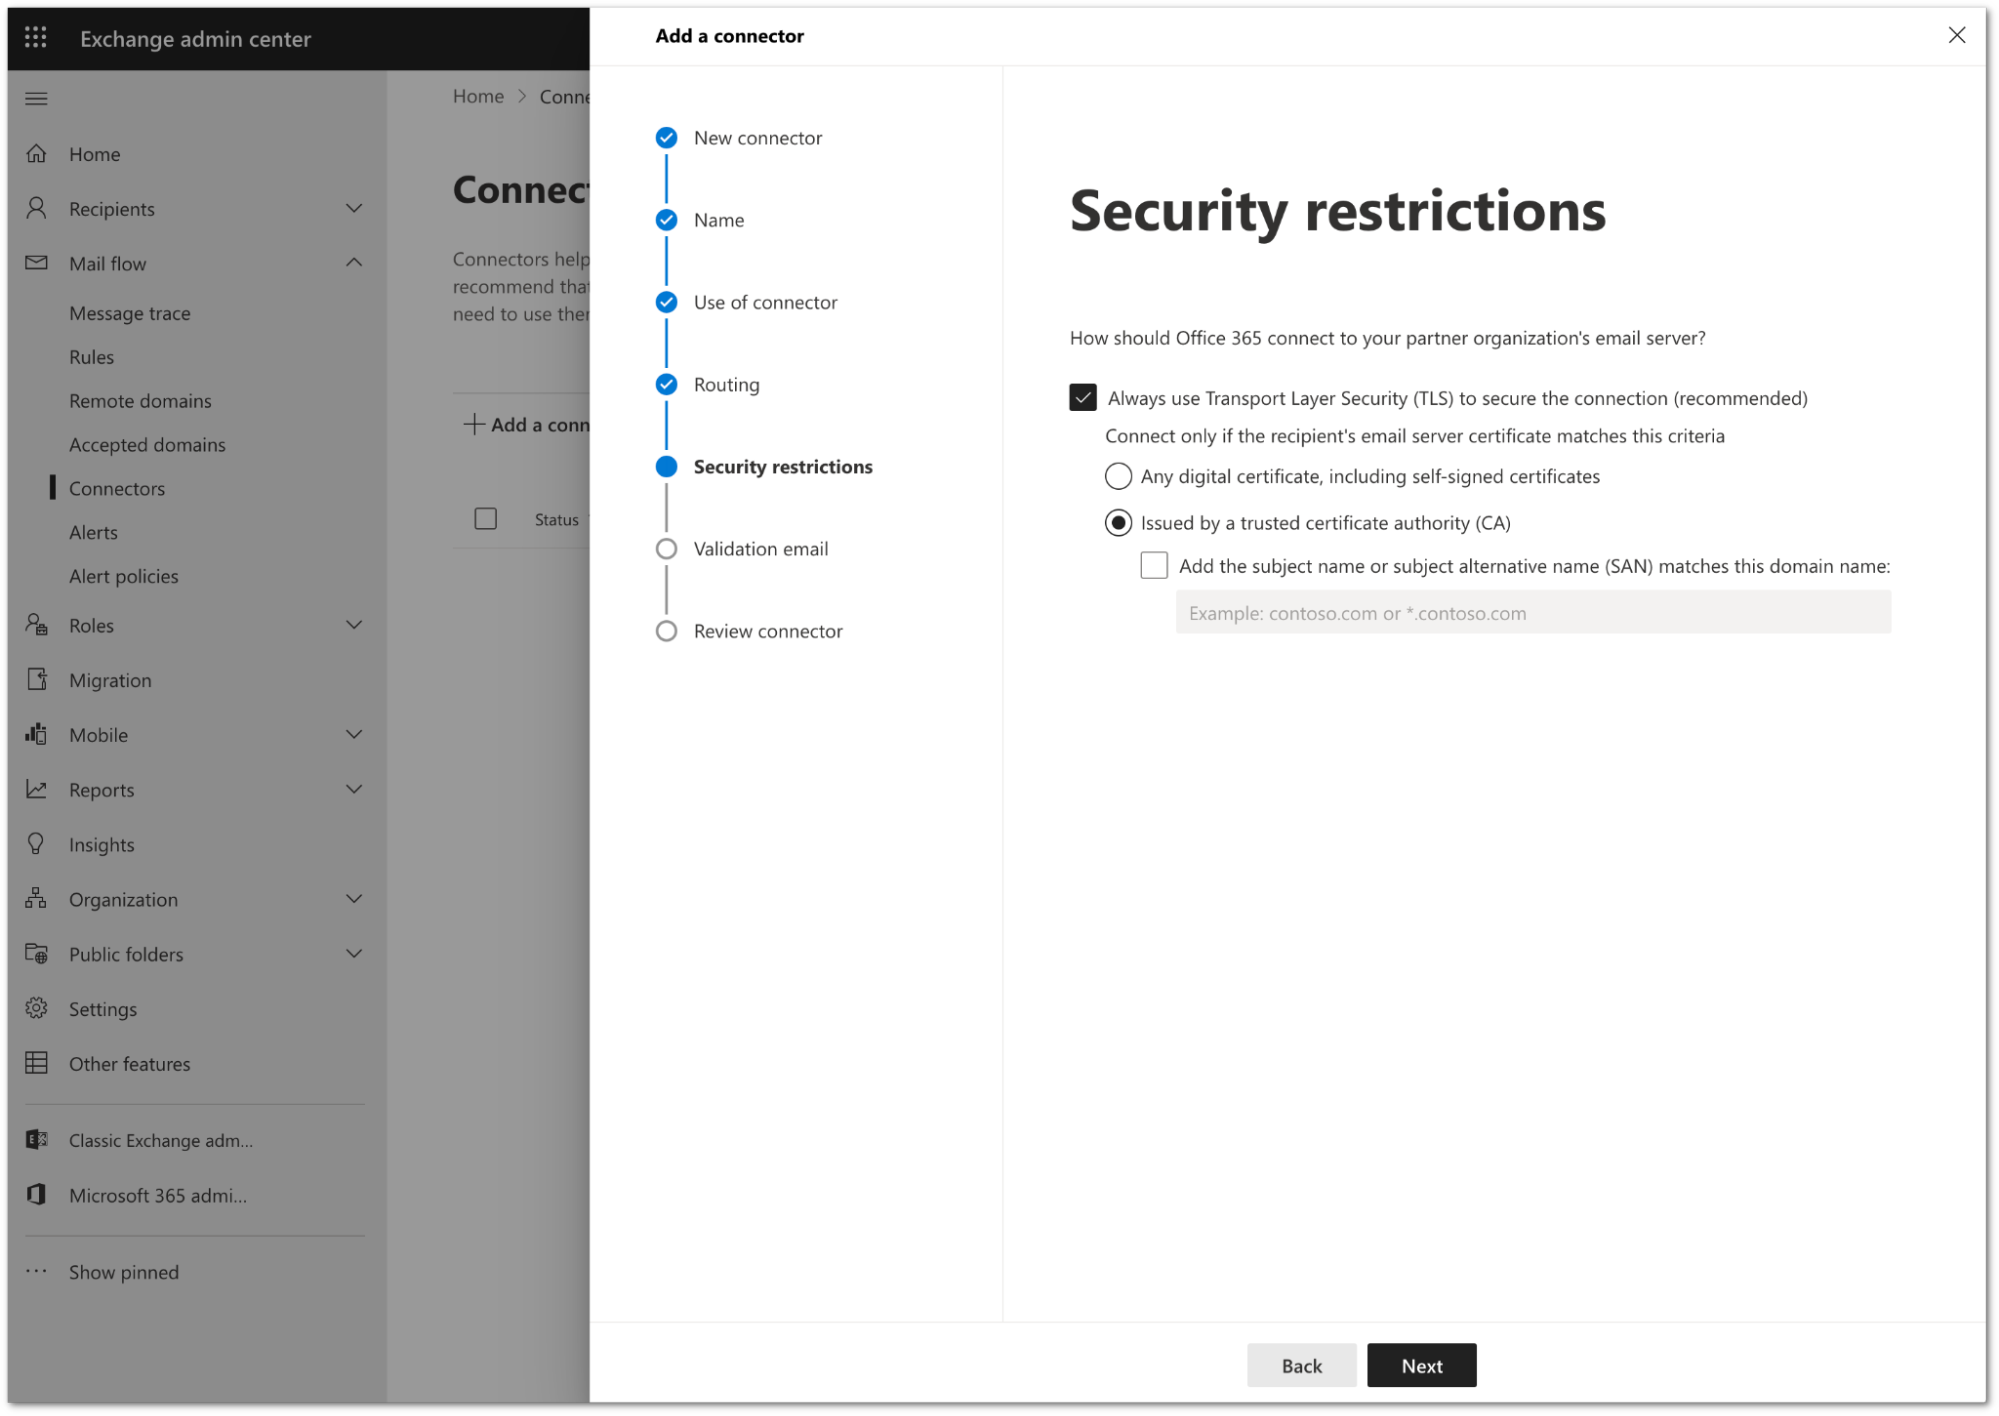
Select Next.
You need to validate the connector by using your tenant’s specific journaling address. To find this address, go to the Area 1 dashboard > Support > Service Addresses page.
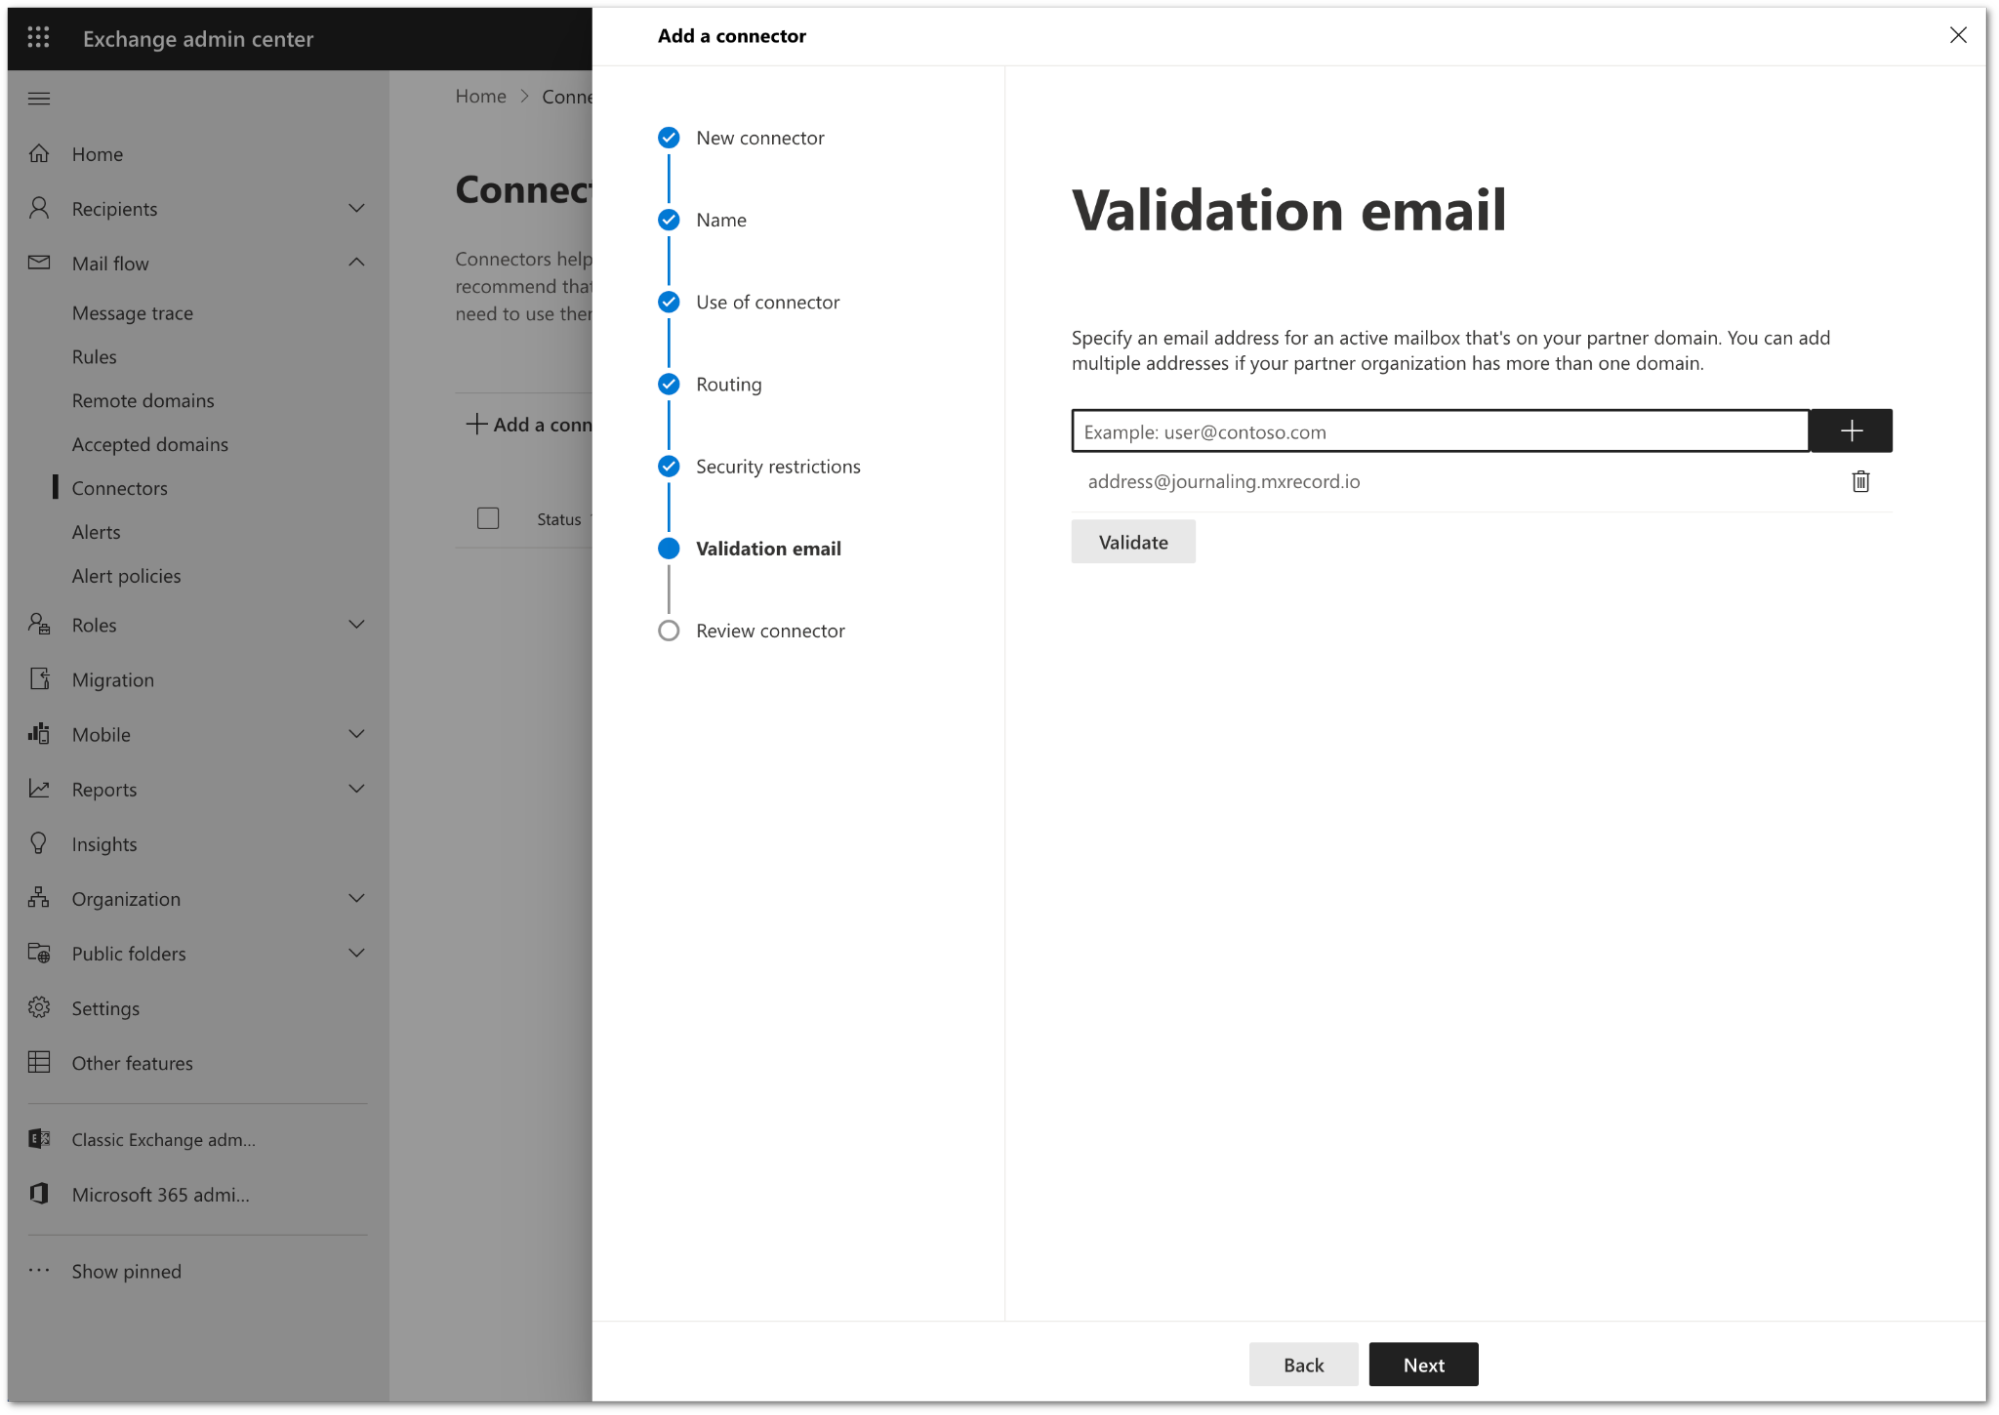
Add the address and select Validate.
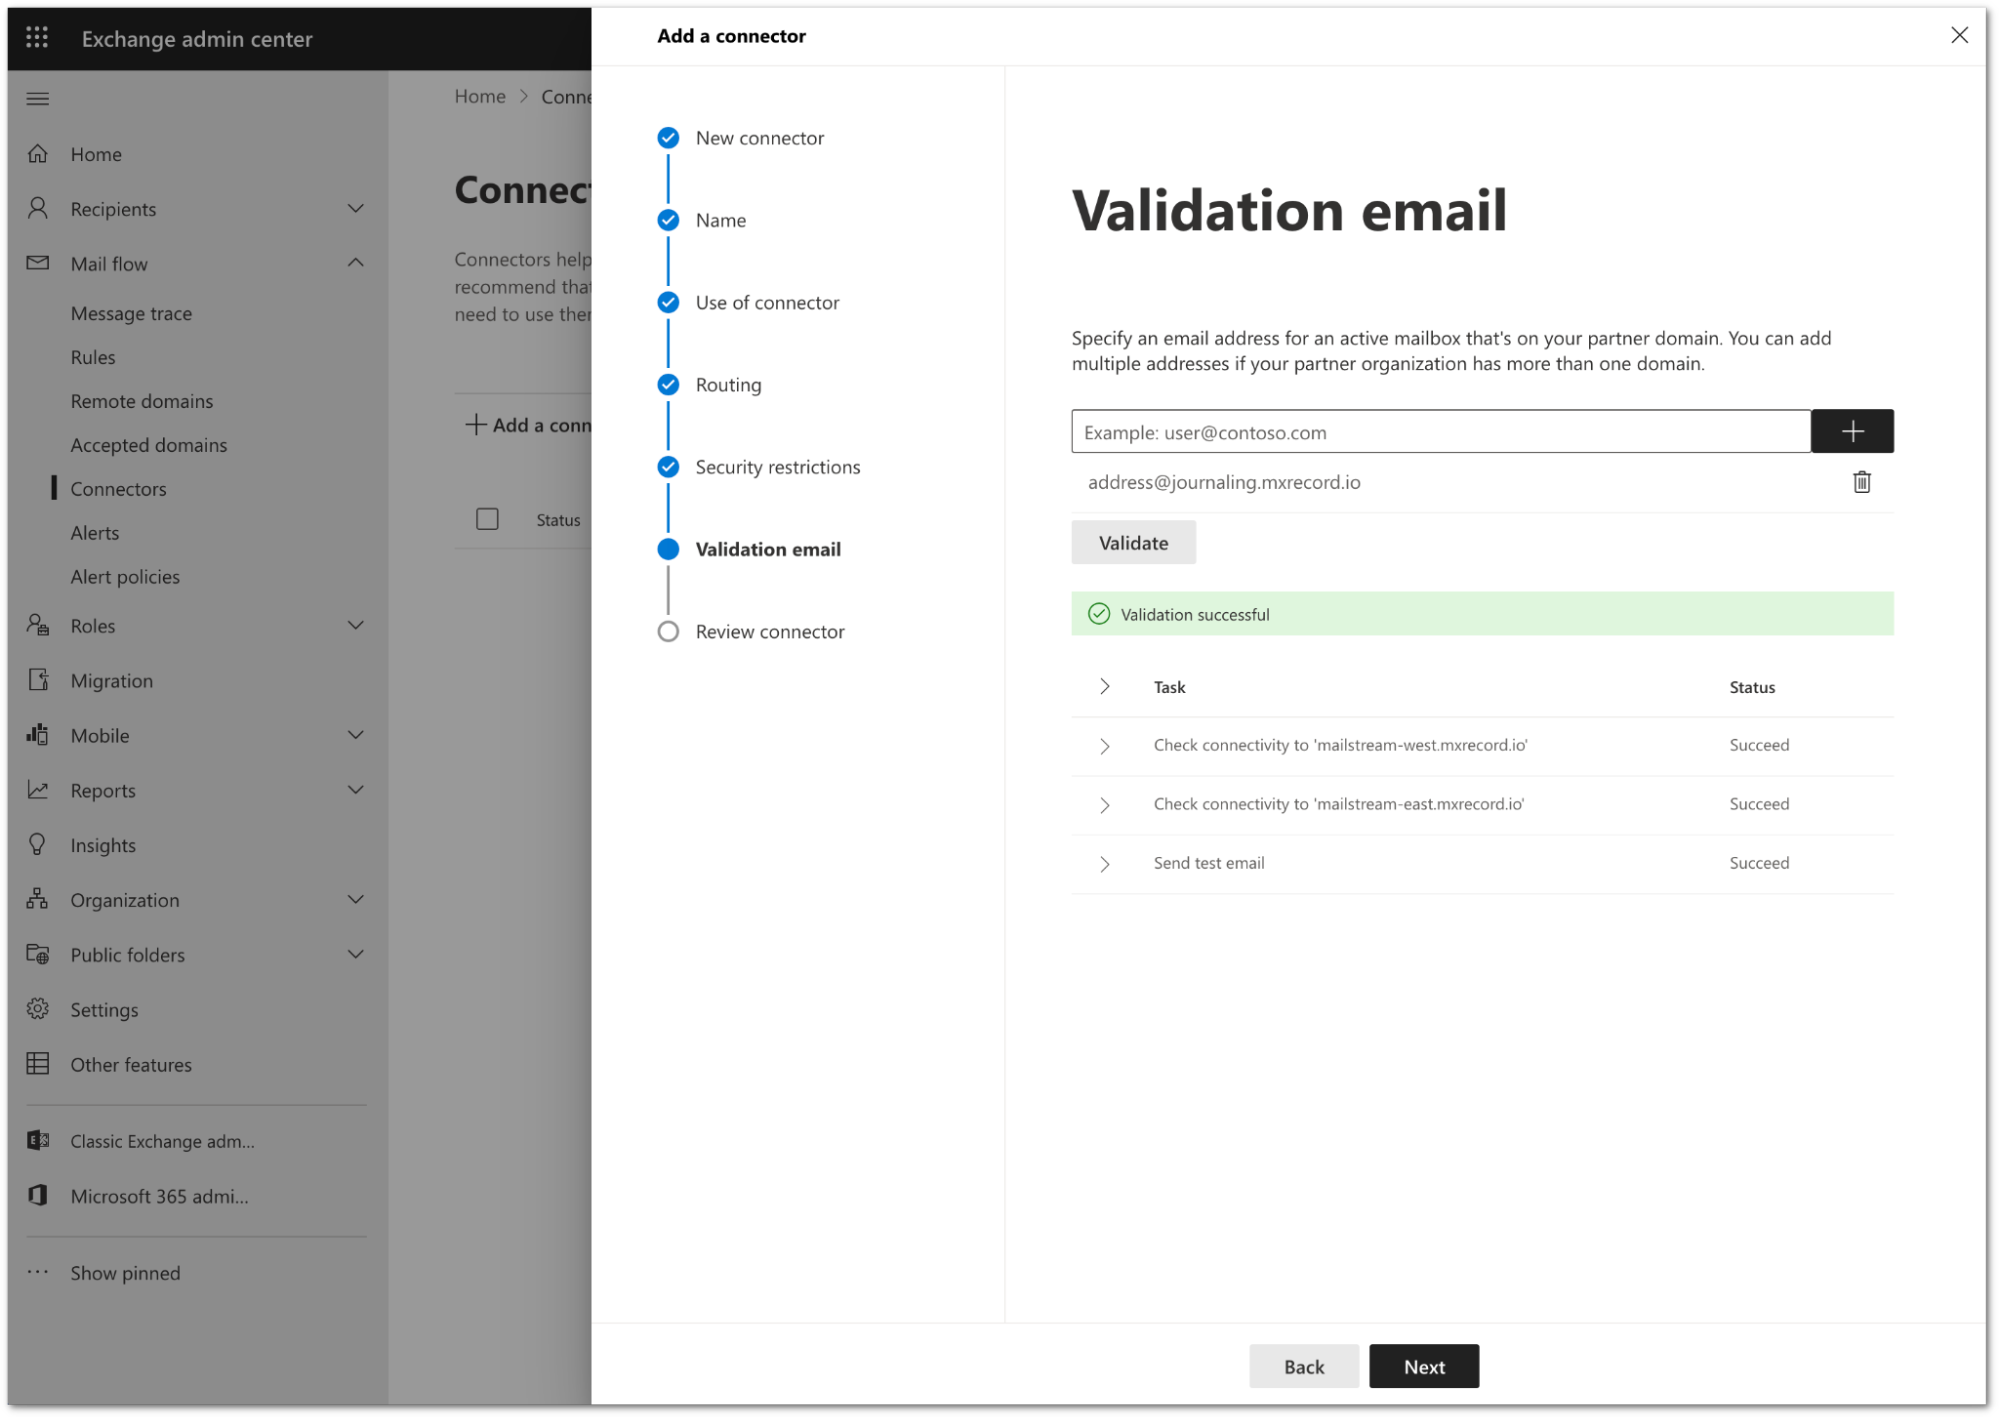
Once the validation completes, you should receive a Succeed status for all the tasks. Select Next.
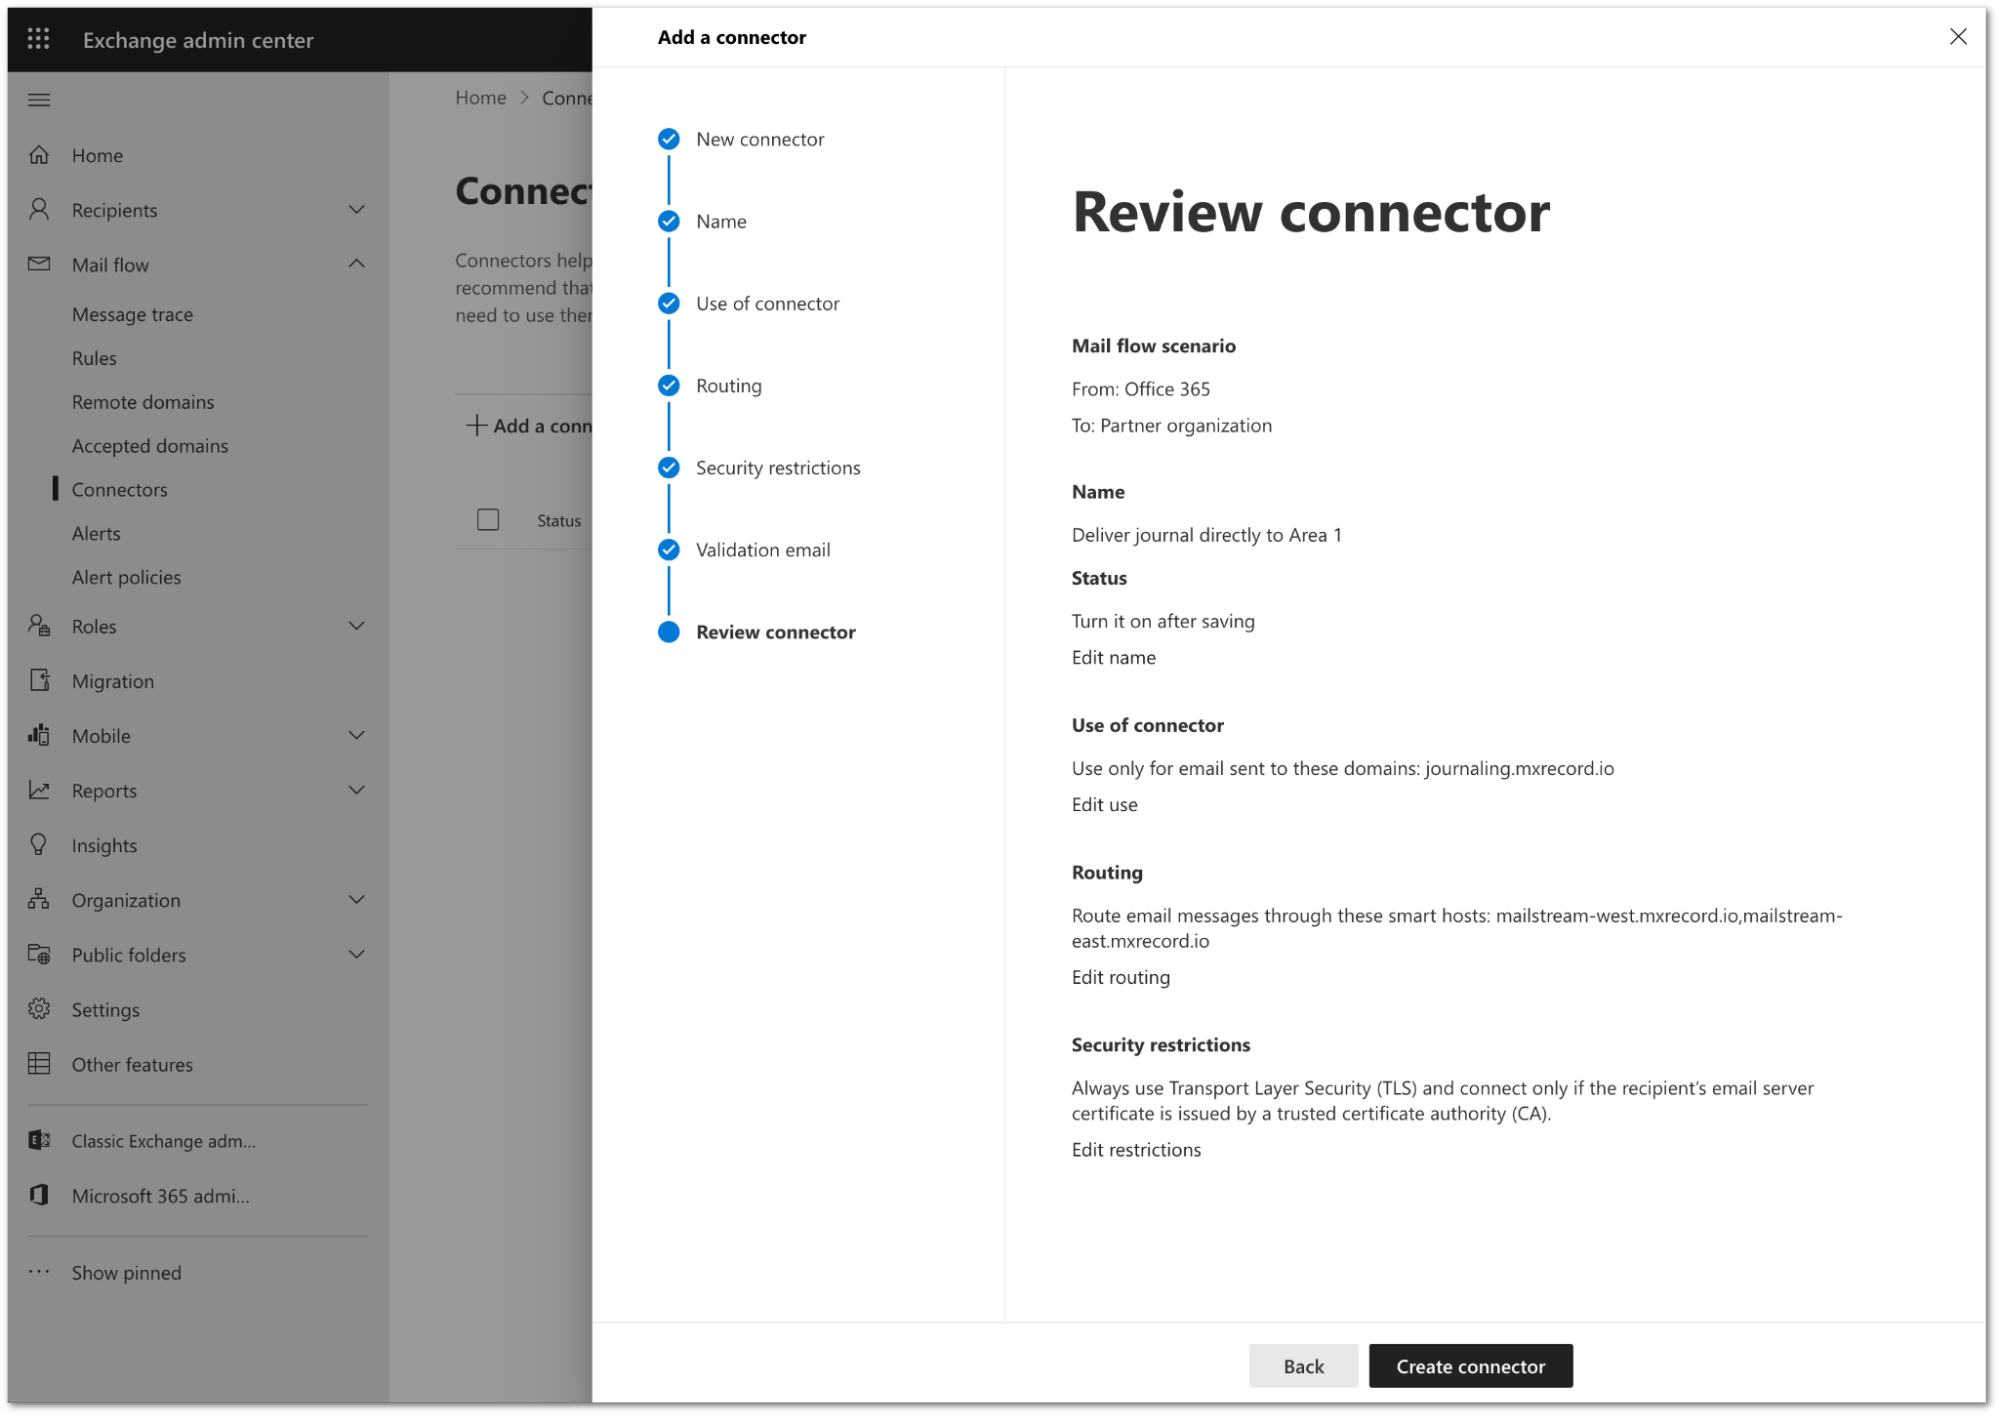
Review the configuration and select Create connector.
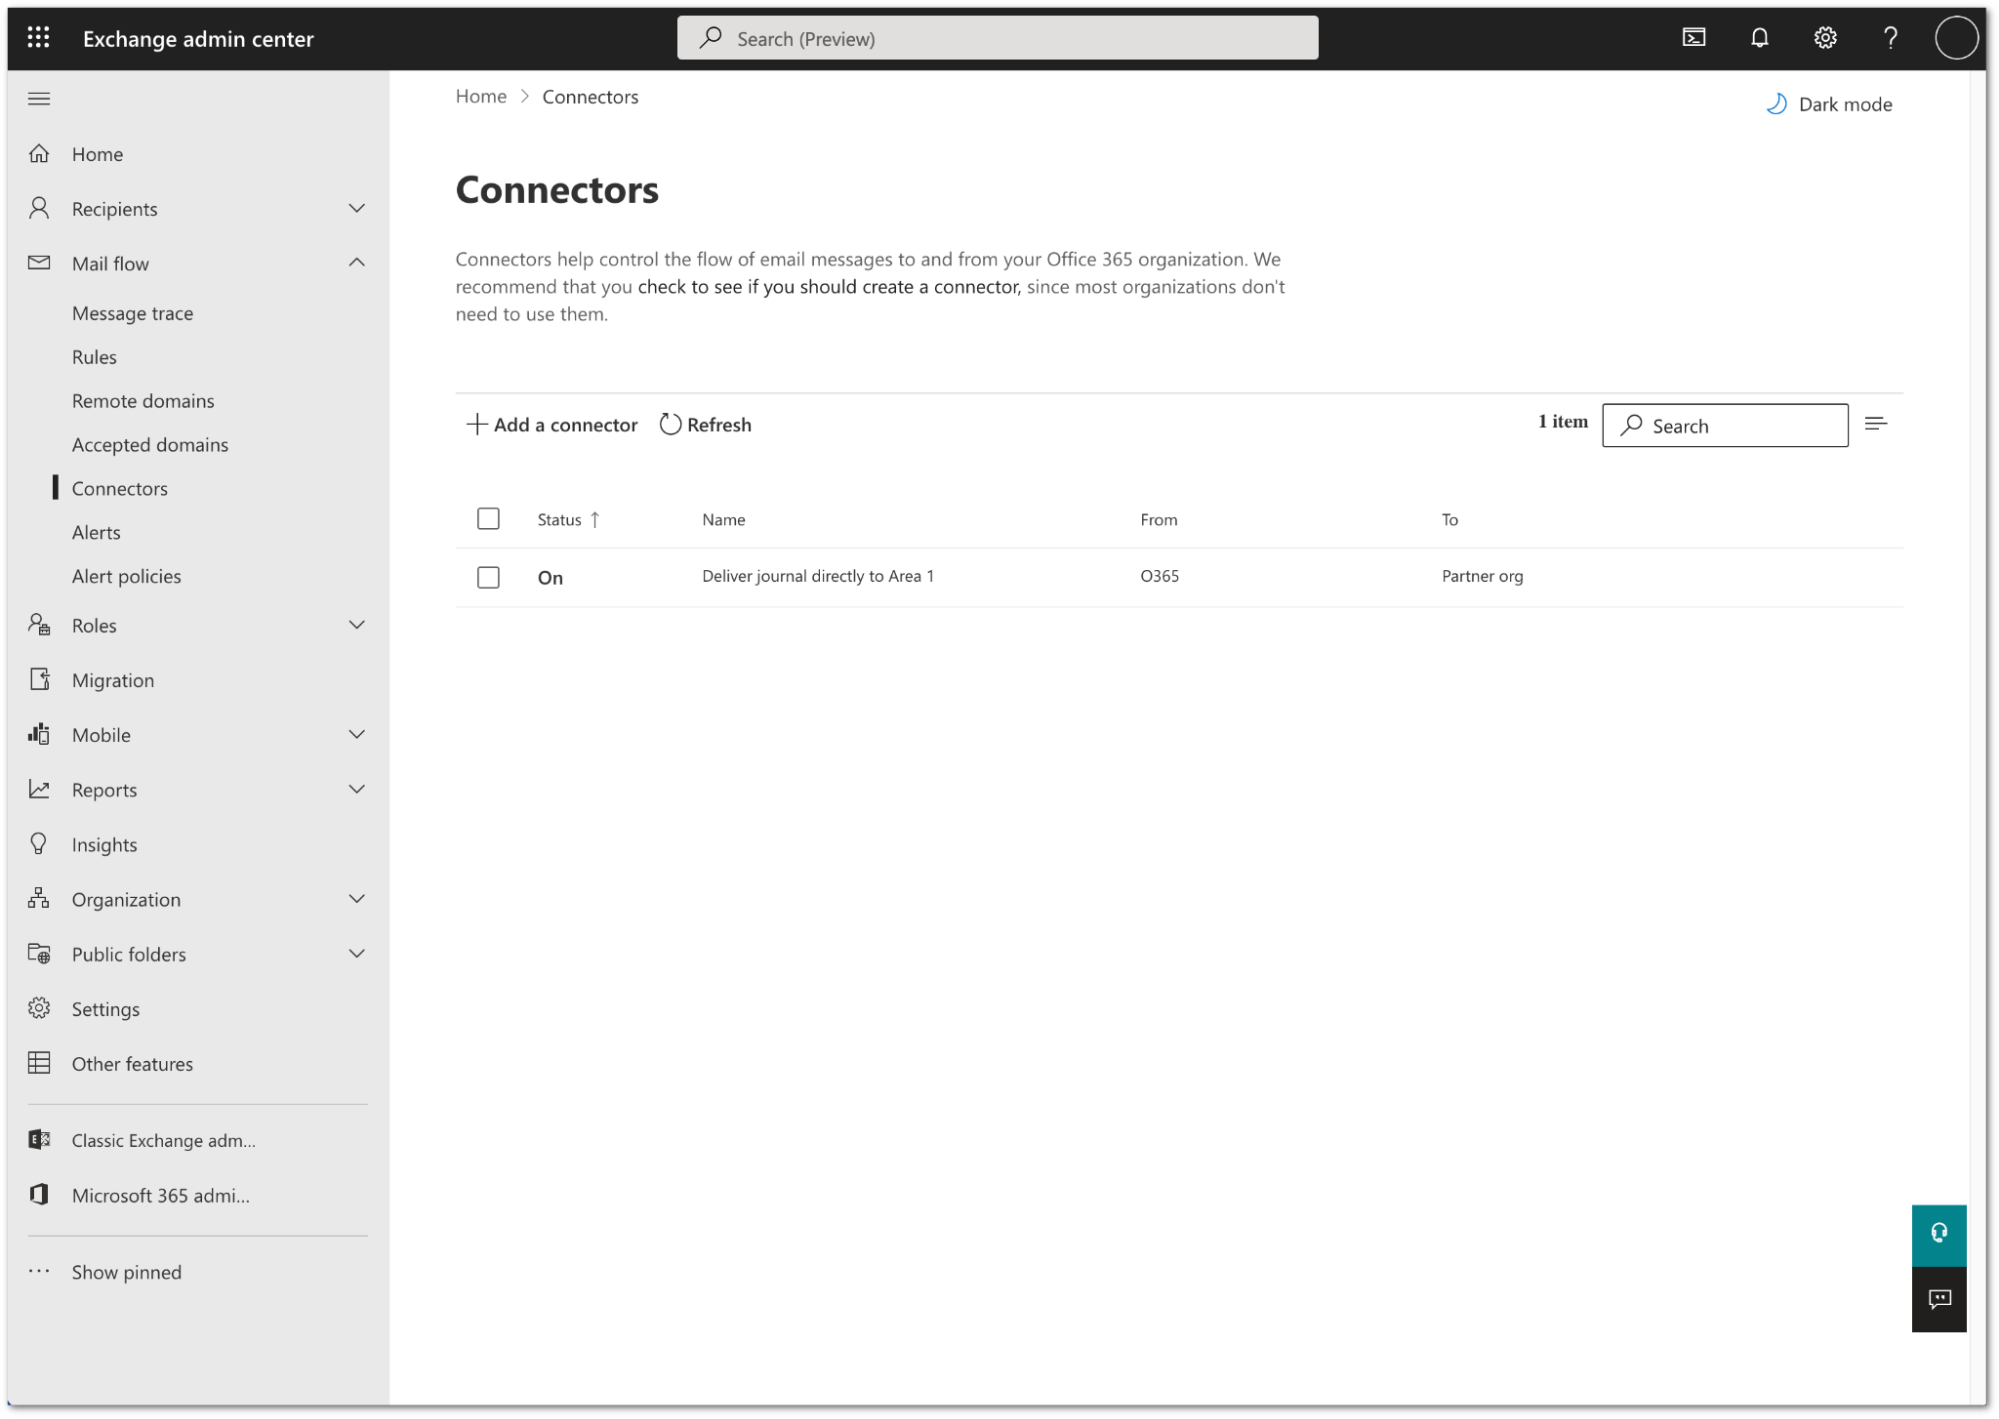
Your connector is now active. You can find it in Exchange admin center > Mail flow > Connectors.
2. Configure journal rule
Log in to the Microsoft Purview compliance portal.
Go to Data lifecycle management > Exchange (legacy).
Select Settings (the gear icon).
In Send undeliverable journal reports to enter the email address of a valid user account. Note that you cannot use a team or group address.
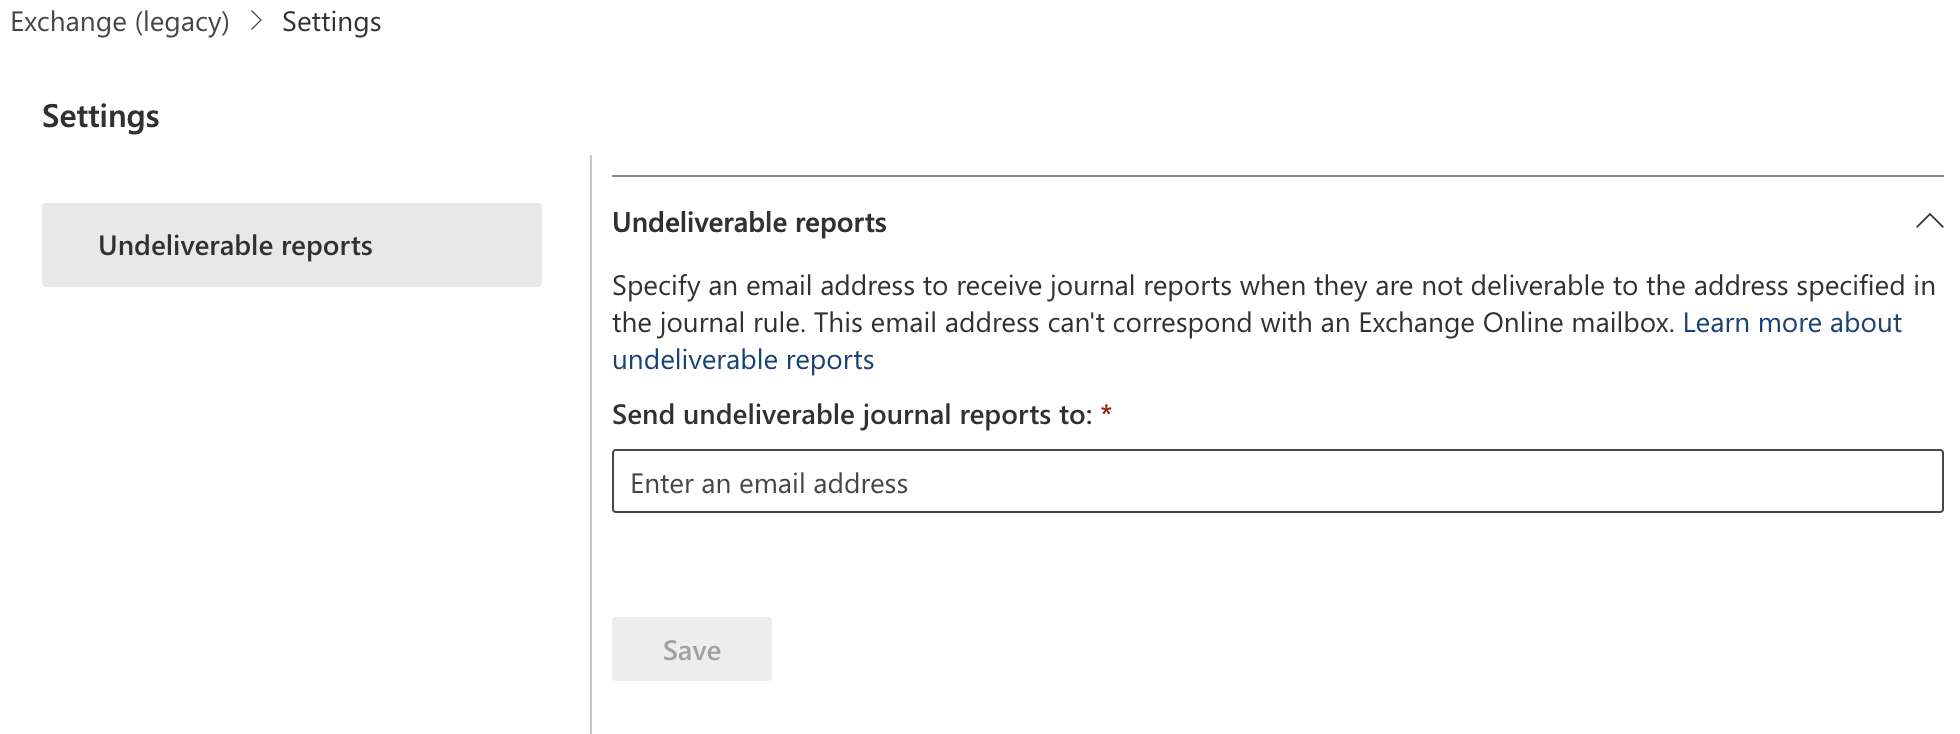
Select Save.
Still in the Exchange (legacy) screen, select Journal Rules.
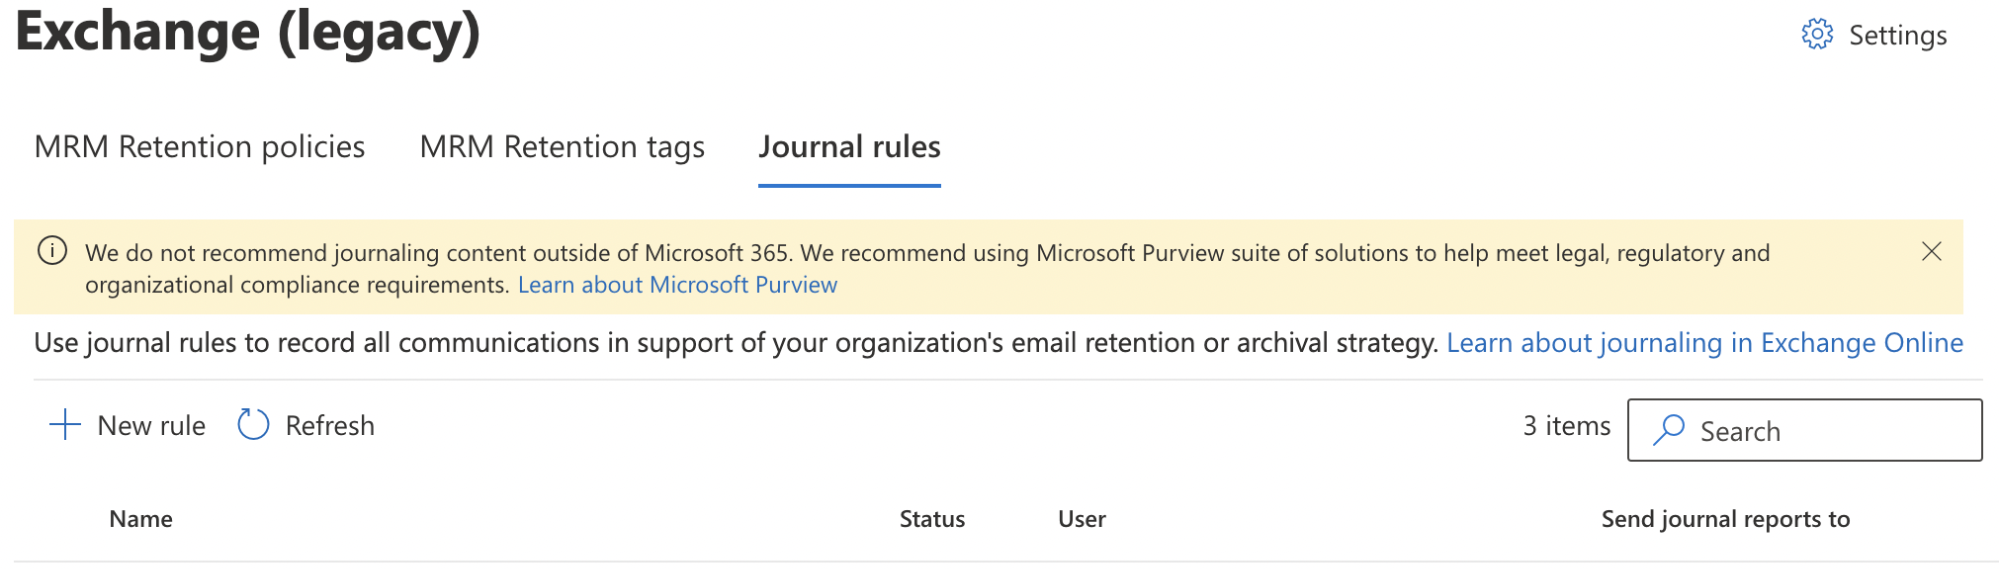
Select New rule to configure a journaling rule, and configure it as follows:
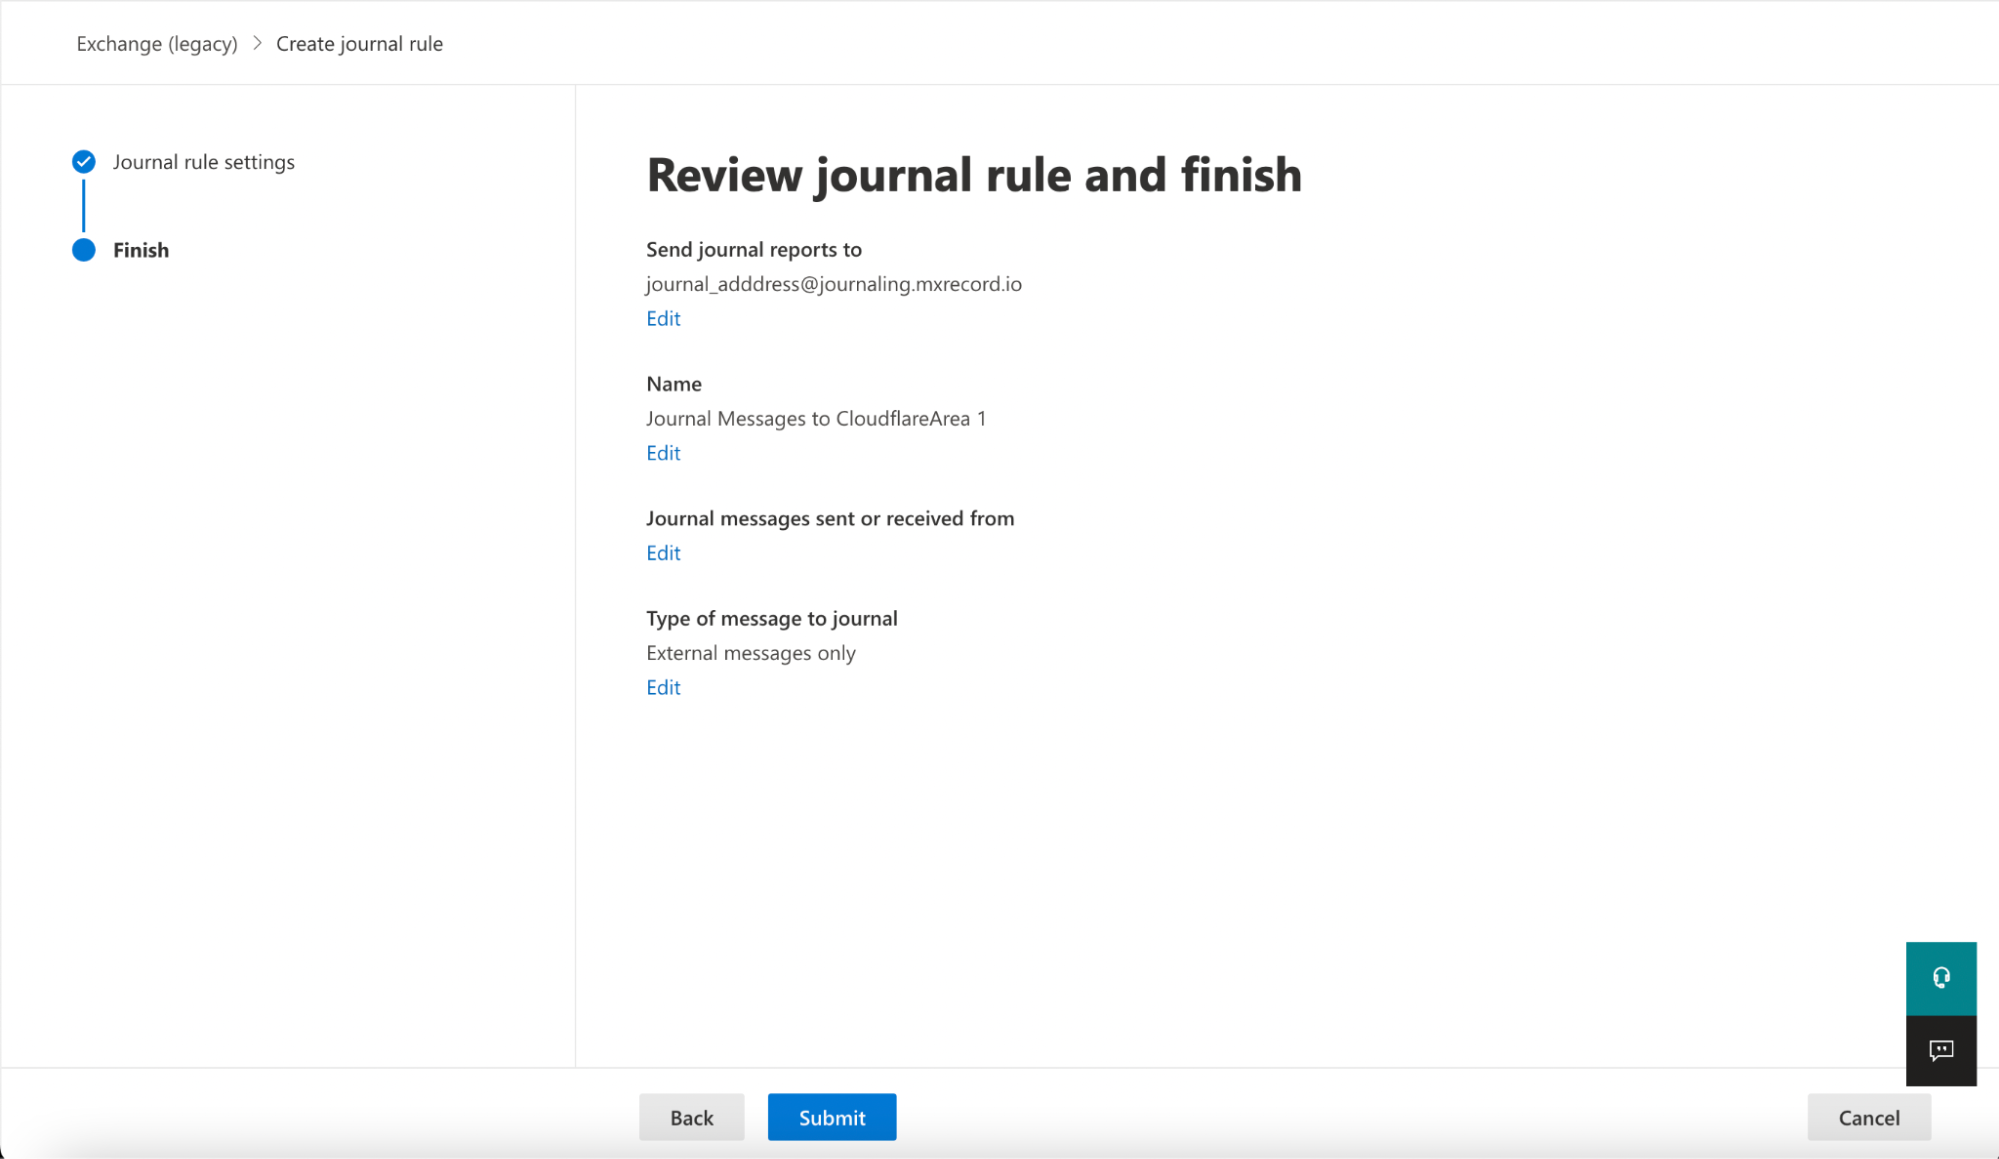
- Send journal reports to: This address is specific to each customer tenant, and can be found in your Area 1 dashboard. For example,
<customer_name>@journaling.mxrecord.io. - Journal Rule Name:
Journal Messages to CloudflareArea 1 - Journal messages sent or received from: Everyone
- Type of message to journal: External messages only
- Send journal reports to: This address is specific to each customer tenant, and can be found in your Area 1 dashboard. For example,
Select Next.
Verify the information is correct, and select Submit > Done.
Once saved, the rule is automatically active. However, it may take a few minutes for the configuration to propagate and start pushing messages to Cloudflare Area 1. After it propagates, you can access the Cloudflare Area 1 dashboard to check the number of messages processed. This number will grow as journaled messages are sent to Cloudflare Area 1 from your Exchange server.
3. Compliance
Create Office 365 distribution lists
For compliance purposes, you might be required to process emails from EU customers in EU servers. If that is your case, and you have customers in other regions as well, you should create two Office 365 distribution lists - one for the EU and one for the US - before configuring your journal rule.
Configure journal rule
After creating the distribution lists based on regions for your users, configure your journal rule:
Log in to the Microsoft Purview compliance portal.
Go to Data lifecycle management > Exchange (legacy).
Select Settings (the gear icon).
In Send undeliverable journal reports to enter the email address of a valid user account. Note that you cannot use a team or group address.
Select Save.
Still in the Exchange (legacy) screen, select Journal Rules.
Select New rule to configure a journaling rule, and configure it as follows:
- Send journal reports to: This address is specific to each customer tenant, and can be found in your Area 1 dashboard.
- Choose
<customer_name>@journaling.mxrecord.ioif you plan to use with the group you created for your US/international users. - Choose
<customer_name>@mailstream-eu-primary.journaling.mxrecord.ioif you plan to use with the group you created for your EU users.
- Choose
- Journal Rule Name:
Journal Messages to CloudflareArea 1 - Journal messages sent or received from: A specific user or group and select the user group you created above.
- Type of message to journal: External messages only
- Send journal reports to: This address is specific to each customer tenant, and can be found in your Area 1 dashboard.
Select Next.
Verify the information is correct, and select Submit > Done.
Once saved, the rule is automatically active. However, it may take a few minutes for the configuration to propagate and start pushing messages to Cloudflare Area 1. After it propagates, you can access the Cloudflare Area 1 dashboard to check the number of messages processed. This number will grow as journaled messages are sent to Cloudflare Area 1 from your Exchange server.
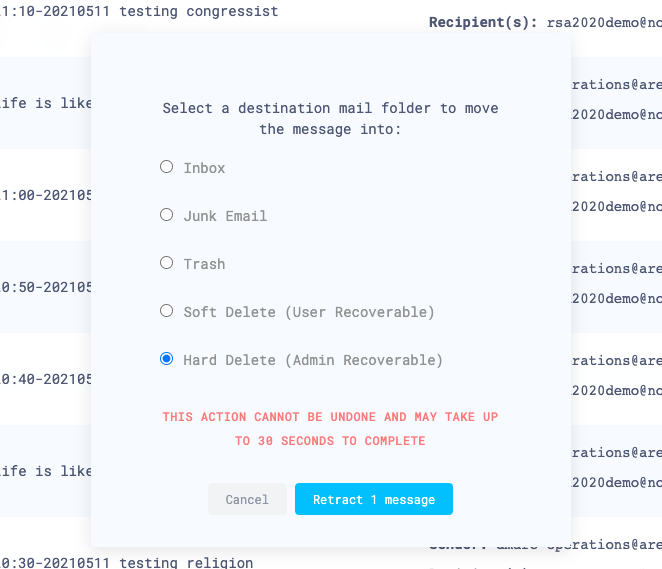
4. Manual message retraction
When retraction is enabled, you can manually retract messages that were not automatically retracted.
Log in to the Area 1 dashboard, and select Settings (the gear icon).
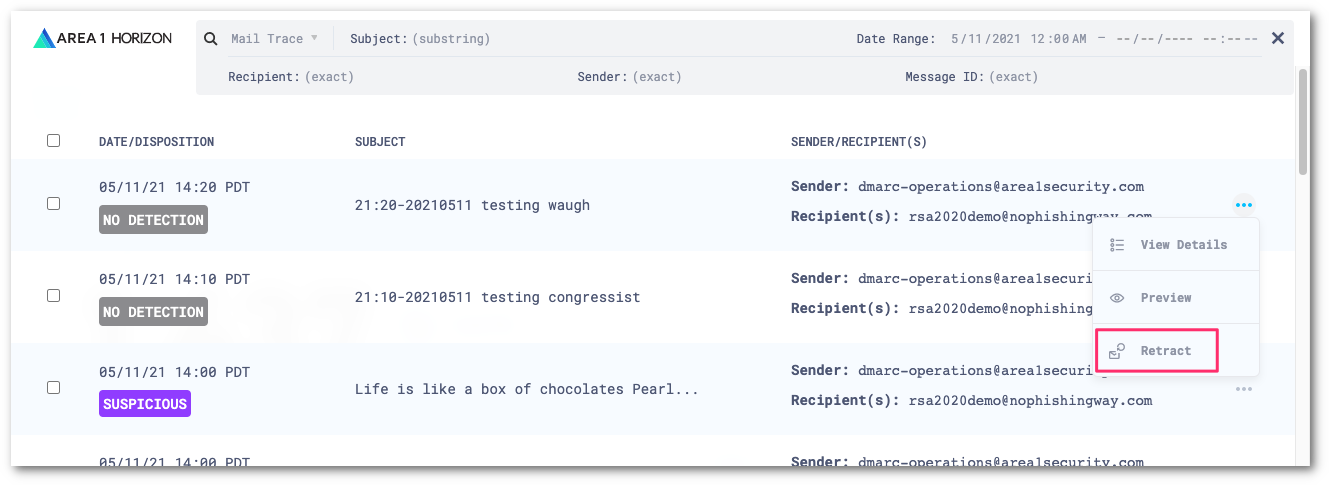
Select the search bar. From the drop-down menu, select Mail Trace.

This will update the search dialog and allow you to search for the messages to retract. Enter the search parameters to find the emails you are looking for.
To retract a single message, select the three dots next to the message, and select Retract. To retract multiple messages, first select the checkboxes on the messages you want to retract. Then, select the three dots > Retract.
Choose where you want to retract the message to, and select Retract message.
If the retraction was successful, there will be positive confirmation on Area 1’s dashboard.
