Connect multiple HTTP origins
You can use Cloudflare Tunnel to connect one or more applications and servers to Cloudflare’s network. Cloudflare Tunnel relies on a piece of software, cloudflared, to create those connections. Instead of pointing a DNS record to a public IP address and relying on IP-based network firewall rules, Cloudflare Tunnel ensures traffic to your origin server passes through Cloudflare’s network where firewall or Zero Trust rules can be applied.
You can deploy a single instance of cloudflared to proxy traffic to a single service with a single hostname or multiple destinations for multiple hostnames.
This tutorial covers how to:
- Start a secure, outbound-only, connection from a machine to Cloudflare for multiple applications
- Give those applications hostnames where users can connect
Time to complete:
10 minutes
Install cloudflared
In this example, two resources are running and need to be connected to the Internet:
- a Hugo site. Hugo, a static site generator, provides a built-in server that can be used for testing changes. That server is available at
localhost:1313. - Grafana, a charting application. Grafana is available at
localhost:3000
Start by downloading and installing the Cloudflare Tunnel daemon, cloudflared. On Mac, you can do so by running the following brew command. If you do not have Homebrew, follow the documentation to install it.
$ brew install cloudflare/cloudflare/cloudflared
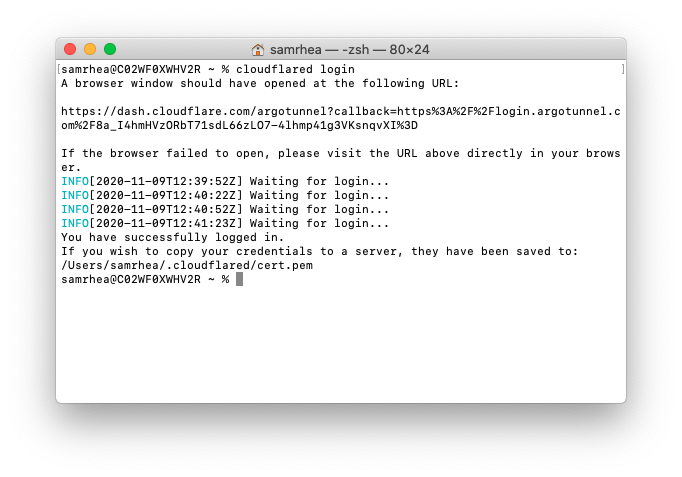
Once installed, run the following command in your Terminal to authenticate this instance of cloudflared into your Cloudflare account.
$ cloudflared login
The command will launch a browser window and prompt you to login with your Cloudflare account. Choose a website that you have added into your account. The authentication is account-wide and you can use the same authentication flow for multiple hostnames in your account regardless of which you choose in this step.
Once you click one of the sites in your account, Cloudflare will download a certificate file, called cert.pem to authenticate this instance of cloudflared. The cert.pem file uses a certificate to authenticate your instance of cloudflared and includes an API key for your account to perform actions like DNS record changes.
You can now use cloudflared to control Cloudflare Tunnel connections in your Cloudflare account.
Create a Tunnel
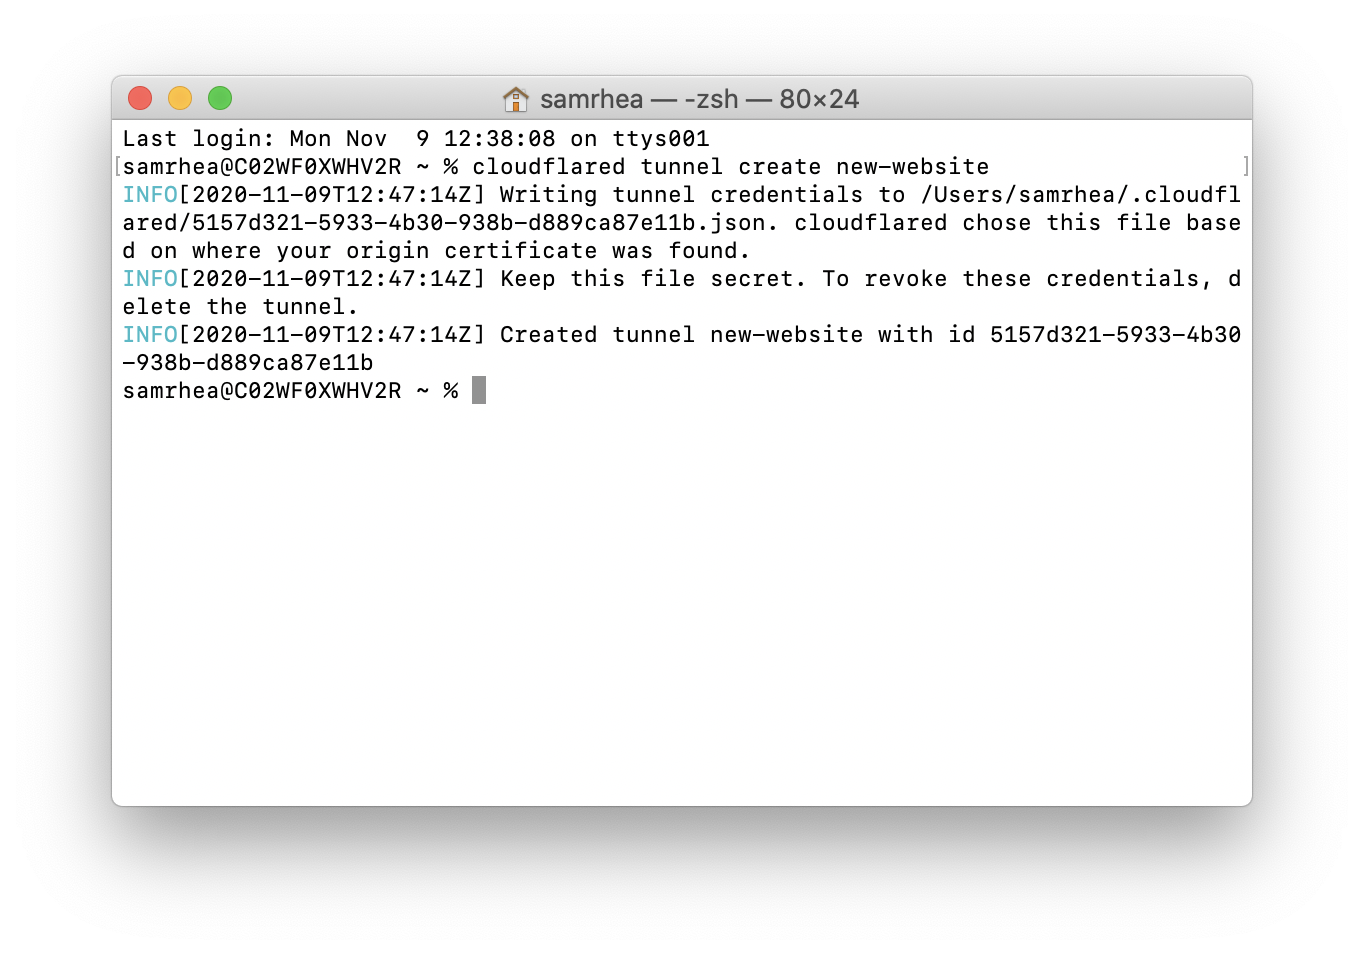
You can now create a Tunnel that will connect cloudflared to Cloudflare’s edge. You’ll configure the details of that Tunnel in the next step.
Run the following command to create a Tunnel. You can replace new-website with any name that you choose. This command requires the cert.pem file.
$ cloudflared tunnel create new-website
Cloudflare will create the Tunnel with that name and generate an ID and credentials file for that Tunnel. This Tunnel will represent both applications and both hostnames.
Configure cloudflared
You can now configure cloudflared to route traffic to both applications for one or many hostnames using ingress rules.
By default, cloudflared expects the configuration file at a specific location: ~/.cloudflared/config.yml. You can modify this location if you want. For this example, we’ll keep the default. Create or edit your configuration file using a text editor.
$ vim ~/.cloudflared/config.yml
The tunnel and credentials-file value can be copied from the output of the tunnel create command or by running cloudflared tunnel list and choosing the Tunnel you intend to use.
tunnel: 5157d321-5933-4b30-938b-d889ca87e11bcredentials-file: /Users/samrhea/.cloudflared/5157d321-5933-4b30-938b-d889ca87e11b.json
ingress:  - hostname: grafana.widgetcorp.tech    service: http://localhost:3000  - hostname: blog.widgetcorp.tech    service: http://localhost:1313  # Catch-all rule, which just responds with 404 if traffic doesn't match any of  # the earlier rules  - service: http_status:404
The configuration above will send traffic received for the grafana subdomain to the Grafana address and traffic bound for the blog subdomain to the Hugo address. The last service rule specifies a catch-all which will respond to requests that do not meet the previous rules. You must include a catch-all. In this case, the catch-all returns a 404.
You can run the following command to validate the configuration file before you start your tunnel. If an error is present, cloudflared will alert you first.
$ cloudflared tunnel validate
Run Cloudflare Tunnel
At this point, you have created and configured your Cloudflare Tunnel connection. You can now run that Tunnel. Running it will create connections to Cloudflare’s edge. Those connections will not respond to traffic, yet. You’ll add DNS records in the next step to share the resource across the Internet.
$ cloudflared tunnel run
We recommend running cloudflared as a service in production. You can also run cloudflared with the Cloudflare Load Balancer alongside traditional, IP-exposed, origin servers during a migration for a zero-downtime cutover.
Create or modify DNS records
You can now route traffic to your Tunnel, and on to both applications, using Cloudflare DNS. Visit the Cloudflare dashboard, select a website, and click on the DNS tab.
Click +Add record and choose CNAME. In the Name field, add the name of the subdomain of your new site. In this example, that would be grafana and blog. Also ensure that Proxy status is turned on.
In the Content field, paste the ID of your Tunnel created earlier and append cfargotunnel.com. Repeat this process for the second subdomain - they will both share the same Tunnel address.
For example, the CNAME entry for grafana and blog should point to the same value; in this example, that would be the following string:
5157d321-5933-4b30-938b-d889ca87e11b.cfargotunnel.com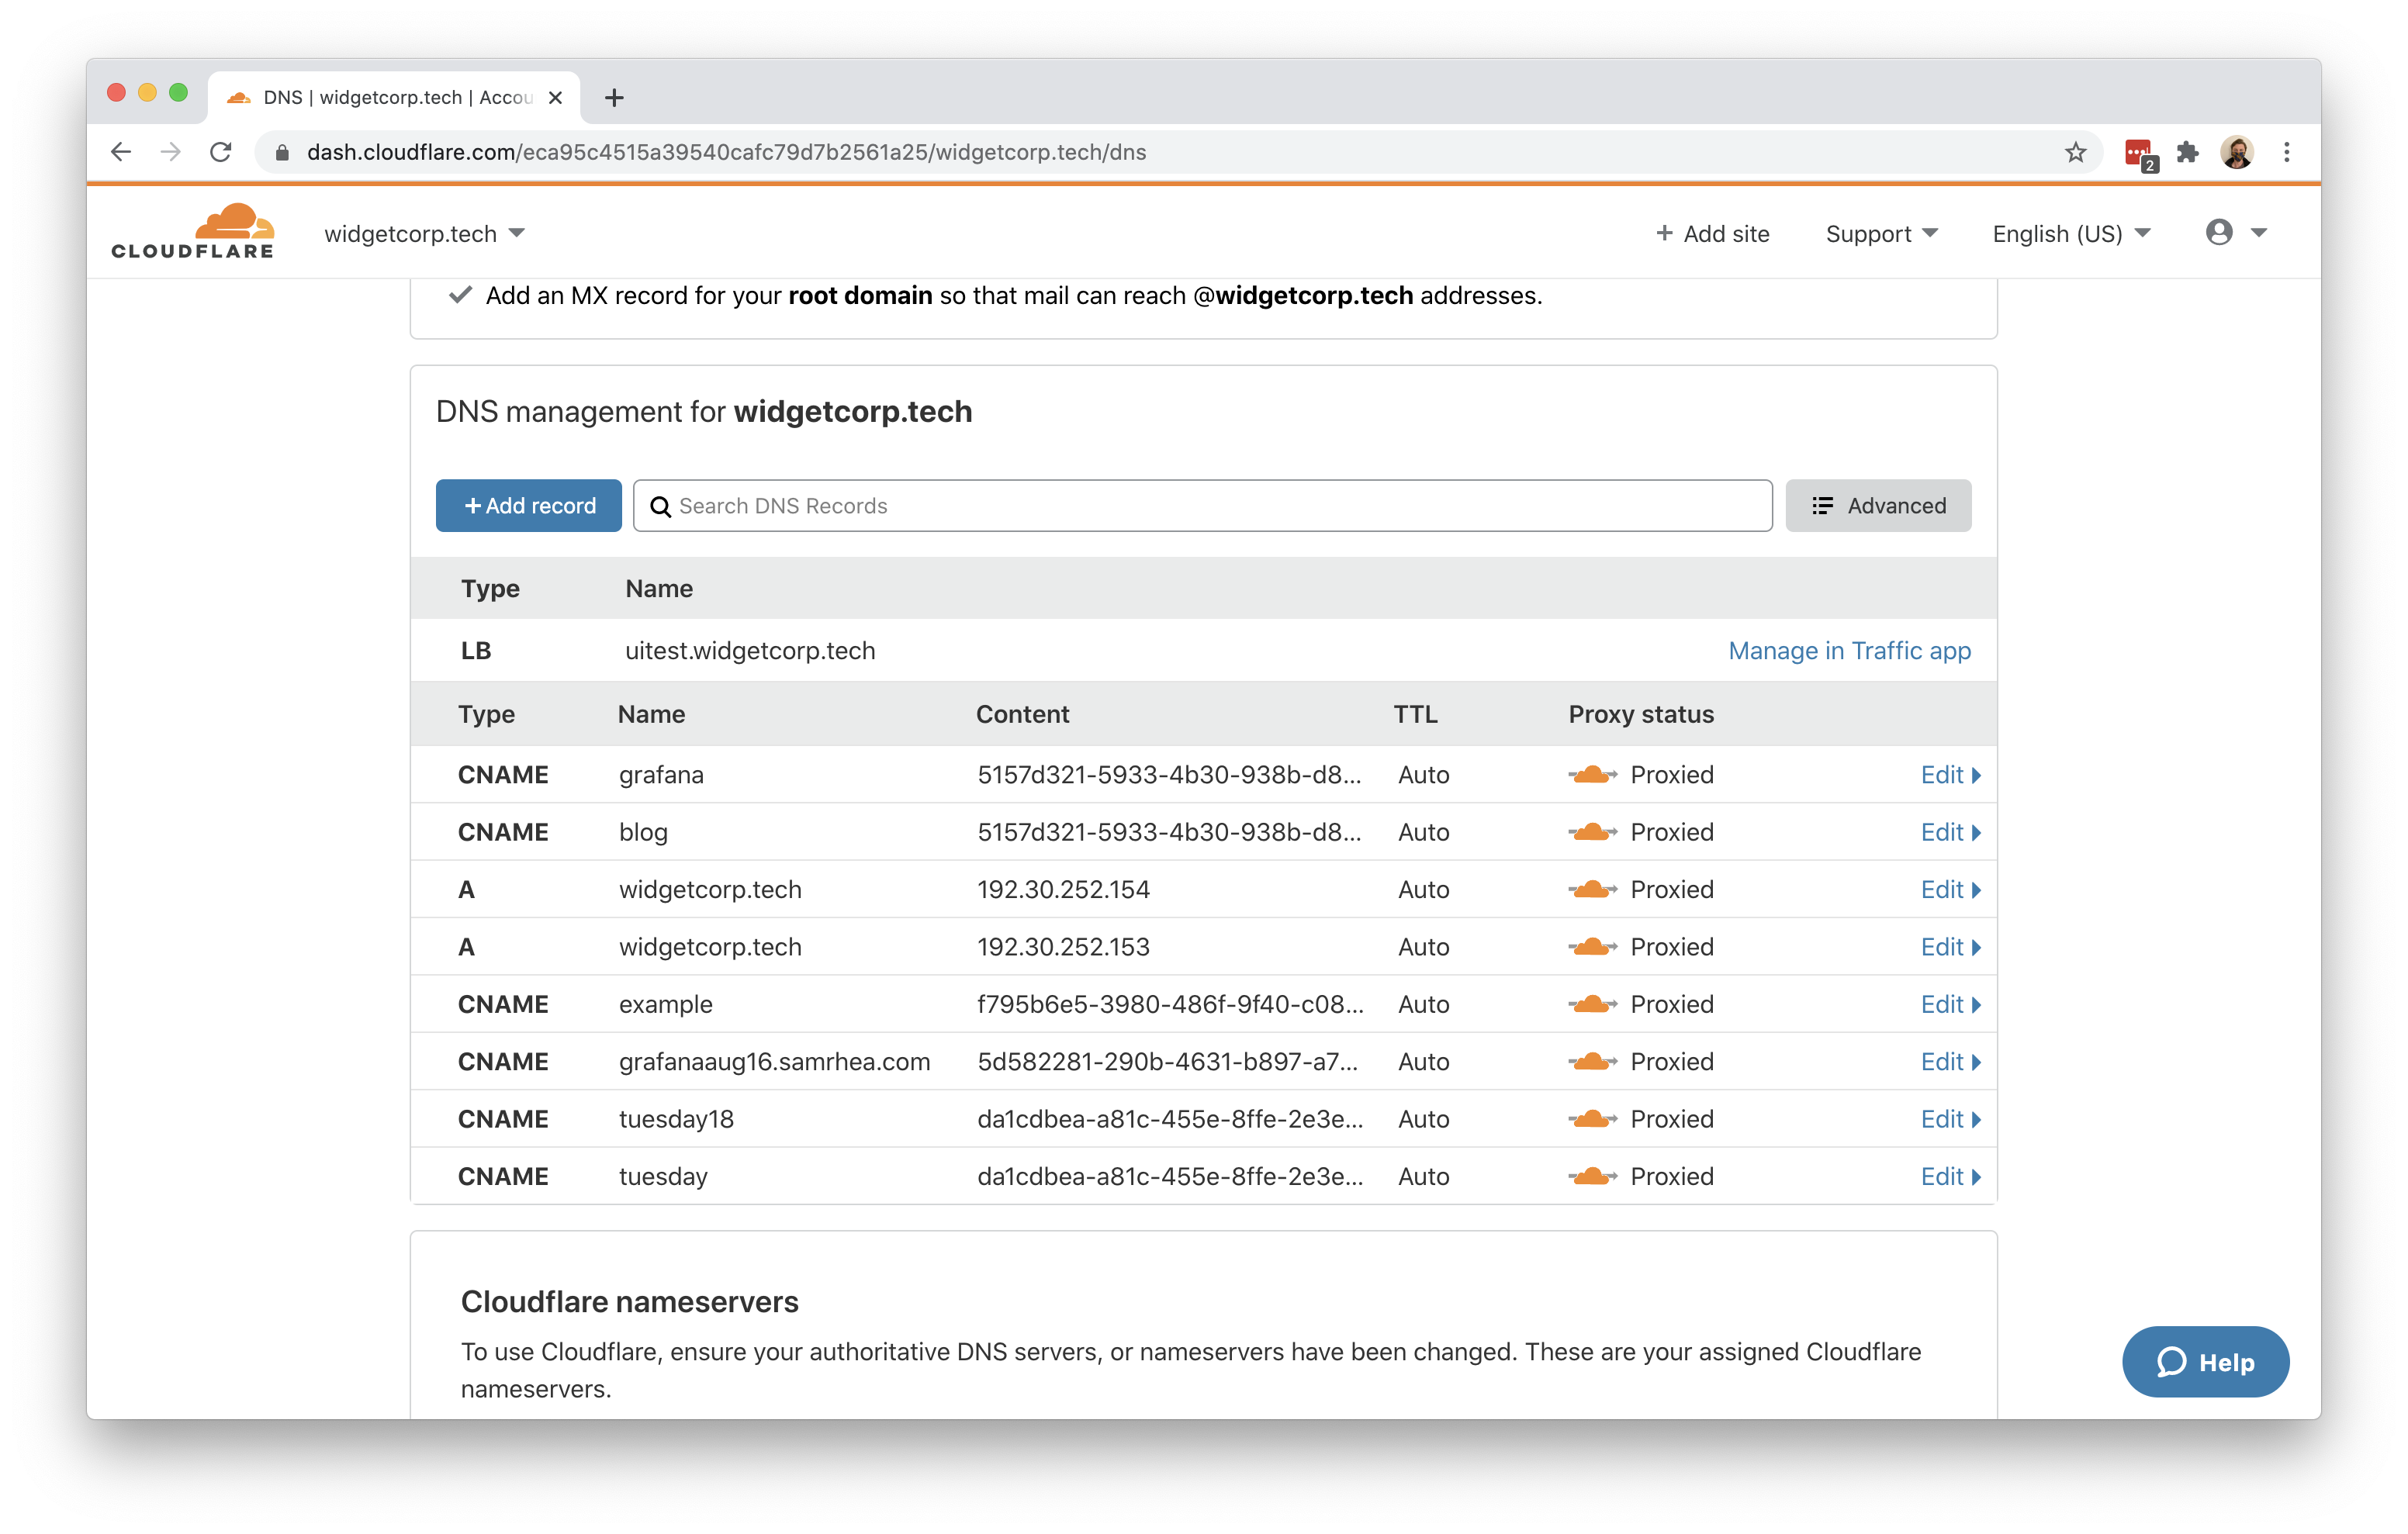
Once saved, you can share the subdomain created and visitors can reach both applications.