Cloudflare Docs
Cloudflare Zero Trust
Visit Cloudflare Zero Trust on GitHub
Set theme to dark (⇧+D)

Connect private networks

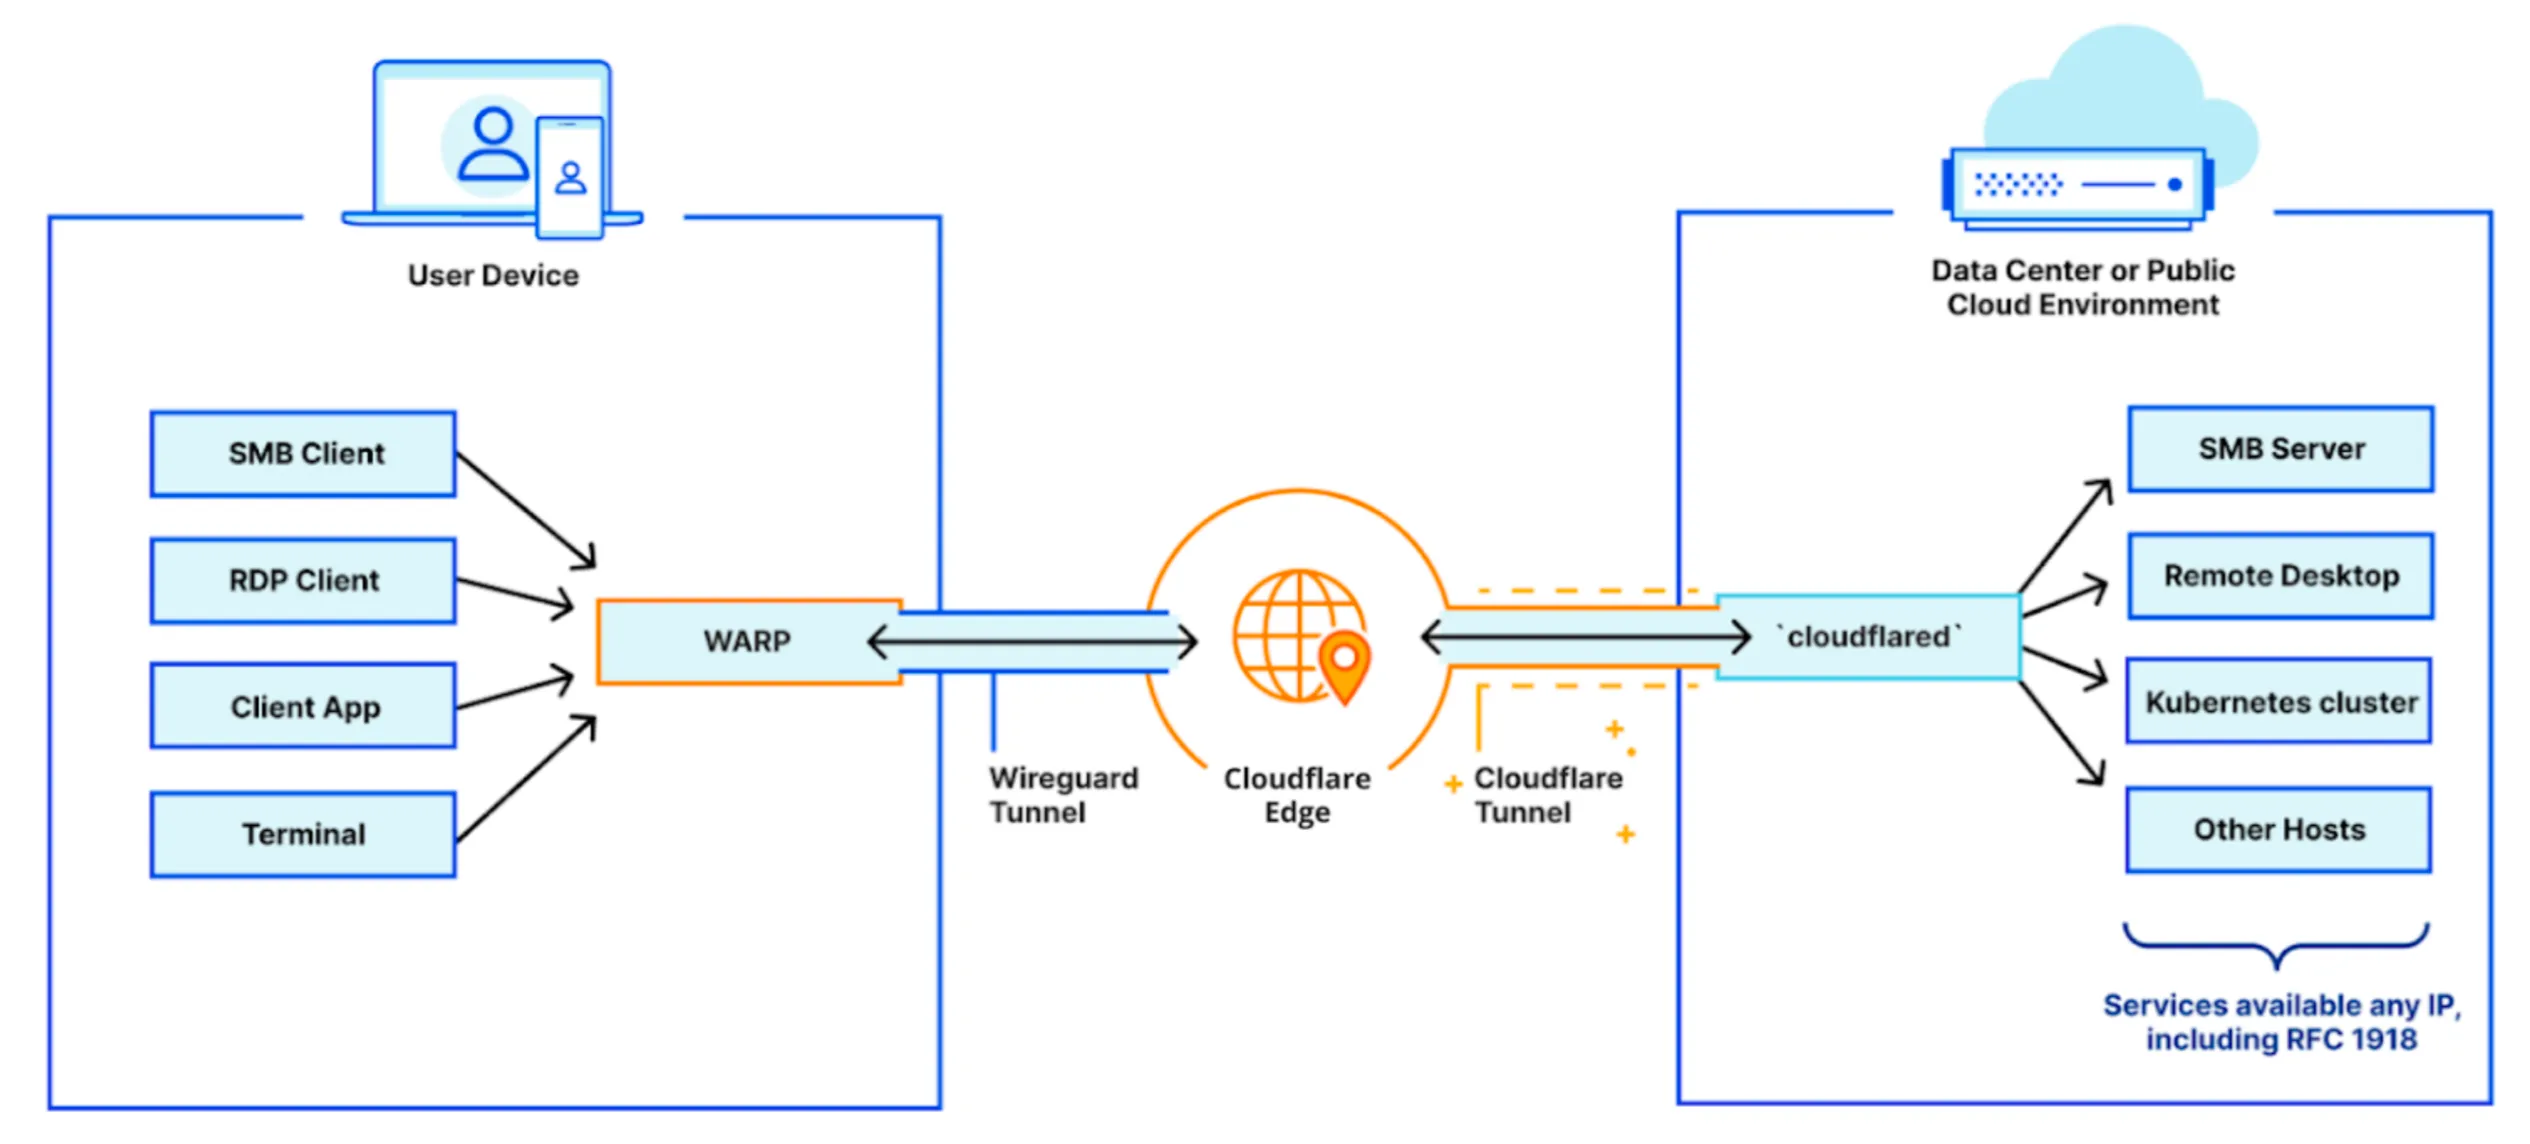
Creating a private network has two components: the server and the client. The server’s infrastructure (whether that is a single application, multiple applications, or a network segment) is connected to Cloudflare’s edge by Cloudflare Tunnel. This is done by running the cloudflared daemon on the server. Simply put, Cloudflare Tunnel is what connects your network to Cloudflare. On the client side, end users connect to Cloudflare’s edge using the Cloudflare WARP agent. This agent can be rolled out to your entire organization in just a few minutes using your in-house MDM tooling.

To connect a private network to Cloudflare’s edge, follow the guide below. You can also check out our tutorial.

​​ Prerequisites

  • Deploy the WARP client on your devices in Gateway with WARP mode. The Cloudflare certificate is only required if you want to display a custom block page or filter HTTPS traffic.
  • Create device enrollment rules to determine which devices can enroll to your Zero Trust organization.

​​ 1. Connect the server to Cloudflare

To connect your infrastructure with Cloudflare Tunnel:

  1. Create a Cloudflare Tunnel for your server by following our dashboard setup guide. You can skip the connect an application step and go straight to connecting a network.

  2. In the Private Networks tab for the tunnel, enter the IP/CIDR range of your private network (for example 10.0.0.0/8). This makes the WARP client aware that any requests to this IP range need to be routed to your new tunnel.

By default, all WARP devices enrolled in your Zero Trust organization can connect to your private network through Cloudflare Tunnel. You can configure Gateway to inspect your network traffic and either block or allow access based on user identity and device posture.

​​ Enable the Gateway proxy

  1. In Zero Trust, go to Settings > Network.
  2. Enable Proxy for TCP.
  3. (Recommended) Select UDP to proxy traffic to internal DNS resolvers.
  4. (Recommended) Select ICMP to enable diagnostic tools such as ping and traceroute.

Cloudflare will now proxy traffic from enrolled devices, except for the traffic excluded in your split tunnel settings.

​​ Route private network IPs through Gateway

By default, WARP excludes some IP addresses from Gateway visibility as part of its Split Tunnel feature. For example, WARP automatically excludes RFC 1918 IP addresses such as 10.0.0.0/8, which are IP addresses typically used in private networks and not reachable from the Internet. You will need to make sure that traffic to the IP/CIDR of your private network is sent to Gateway for filtering.

If your network’s IP/CIDR is in a range commonly used by home networks (such as 192.168.0.0/16), consider changing your network’s IP/CIDR to avoid overlap. Alternatively, limit the traffic sent to Gateway to reduce the risk of breaking a user’s access to local resources.

To configure Split Tunnels for private network access:

  1. First, check whether your Split Tunnels mode is set to Exclude or Include mode.
  2. If you are using Include mode, add your network’s IP/CIDR range to the list.
  3. If you are using Exclude mode:
    1. Delete your network’s IP/CIDR range from the list.
    2. Re-add IP/CDIR ranges that are not used by your private network.

For example, if your network uses the default AWS range of 172.31.0.0/16, delete the default entry 172.16.0.0/12 and re-add 172.16.0.0/13, 172.24.0.0/14, 172.28.0.0/15, and 172.30.0.0/16. This ensures that that only traffic to 172.31.0.0/16 is sent to Gateway.

​​ Create Zero Trust policies

You can create Zero Trust policies to manage access to specific applications on your network.

  1. Go to Access > Applications > Add an application.

  2. Select Private Network.

  3. Name your application.

  4. For Application type, select Destination IP.

  5. For Value, enter the IP address for your application (for example, 10.128.0.7).

  6. Configure your App Launcher visibility and logo.

  7. Select Next. You will see two auto-generated Gateway Network policies: one that allows access to the destination IP and another that blocks access.

  8. Modify the policies to include additional identity-based conditions. For example:

    • Policy 1

      ActionSelectorOperatorValue
      AllowDestination IPin10.128.0.7
      User emailMatches regex.*@example.com
    • Policy 2

      ActionSelectorOperatorValue
      BlockDestination IPin10.128.0.7

    Policies are evaluated in numerical order, so a user with an email ending in @example.com will be able to access 10.128.0.7 while all others will be blocked. For more information on building network policies, refer to our dedicated documentation.

  9. Select Add application.

Your application will appear on the Applications page.

​​ 3. Connect as a user

End users can now reach HTTP or TCP-based services on your network by navigating to any IP address in the range you have specified.

​​ Troubleshooting

​​ Device configuration

To check that their device is properly configured, the user can visit https://help.teams.cloudflare.com/ to ensure that:

  • The page returns Your network is fully protected.
  • In HTTP filtering, both WARP and Gateway Proxy are enabled.
  • The Team name matches the Zero Trust organization from which you created the tunnel.

​​ Router configuration

Check the local IP address of the device and ensure that it does not fall within the IP/CIDR range of your private network. For example, some home routers will make DHCP assignments in the 10.0.0.0/24 range, which overlaps with the 10.0.0.0/8 range used by most corporate private networks. When a user’s home network shares the same IP addresses as the routes in your tunnel, their device will be unable to connect to your application.

To resolve the IP conflict, you can either:

  • Reconfigure the user’s router to use a non-overlapping IP range. Compatible routers typically use 192.168.1.0/24, 192.168.0.0/24 or 172.16.0.0/24.

  • Tighten the IP range in your tunnel configuration to exclude the 10.0.0.0/24 range. This will only work if your private network does not have any hosts within 10.0.0.0/24.